
Creating a new award
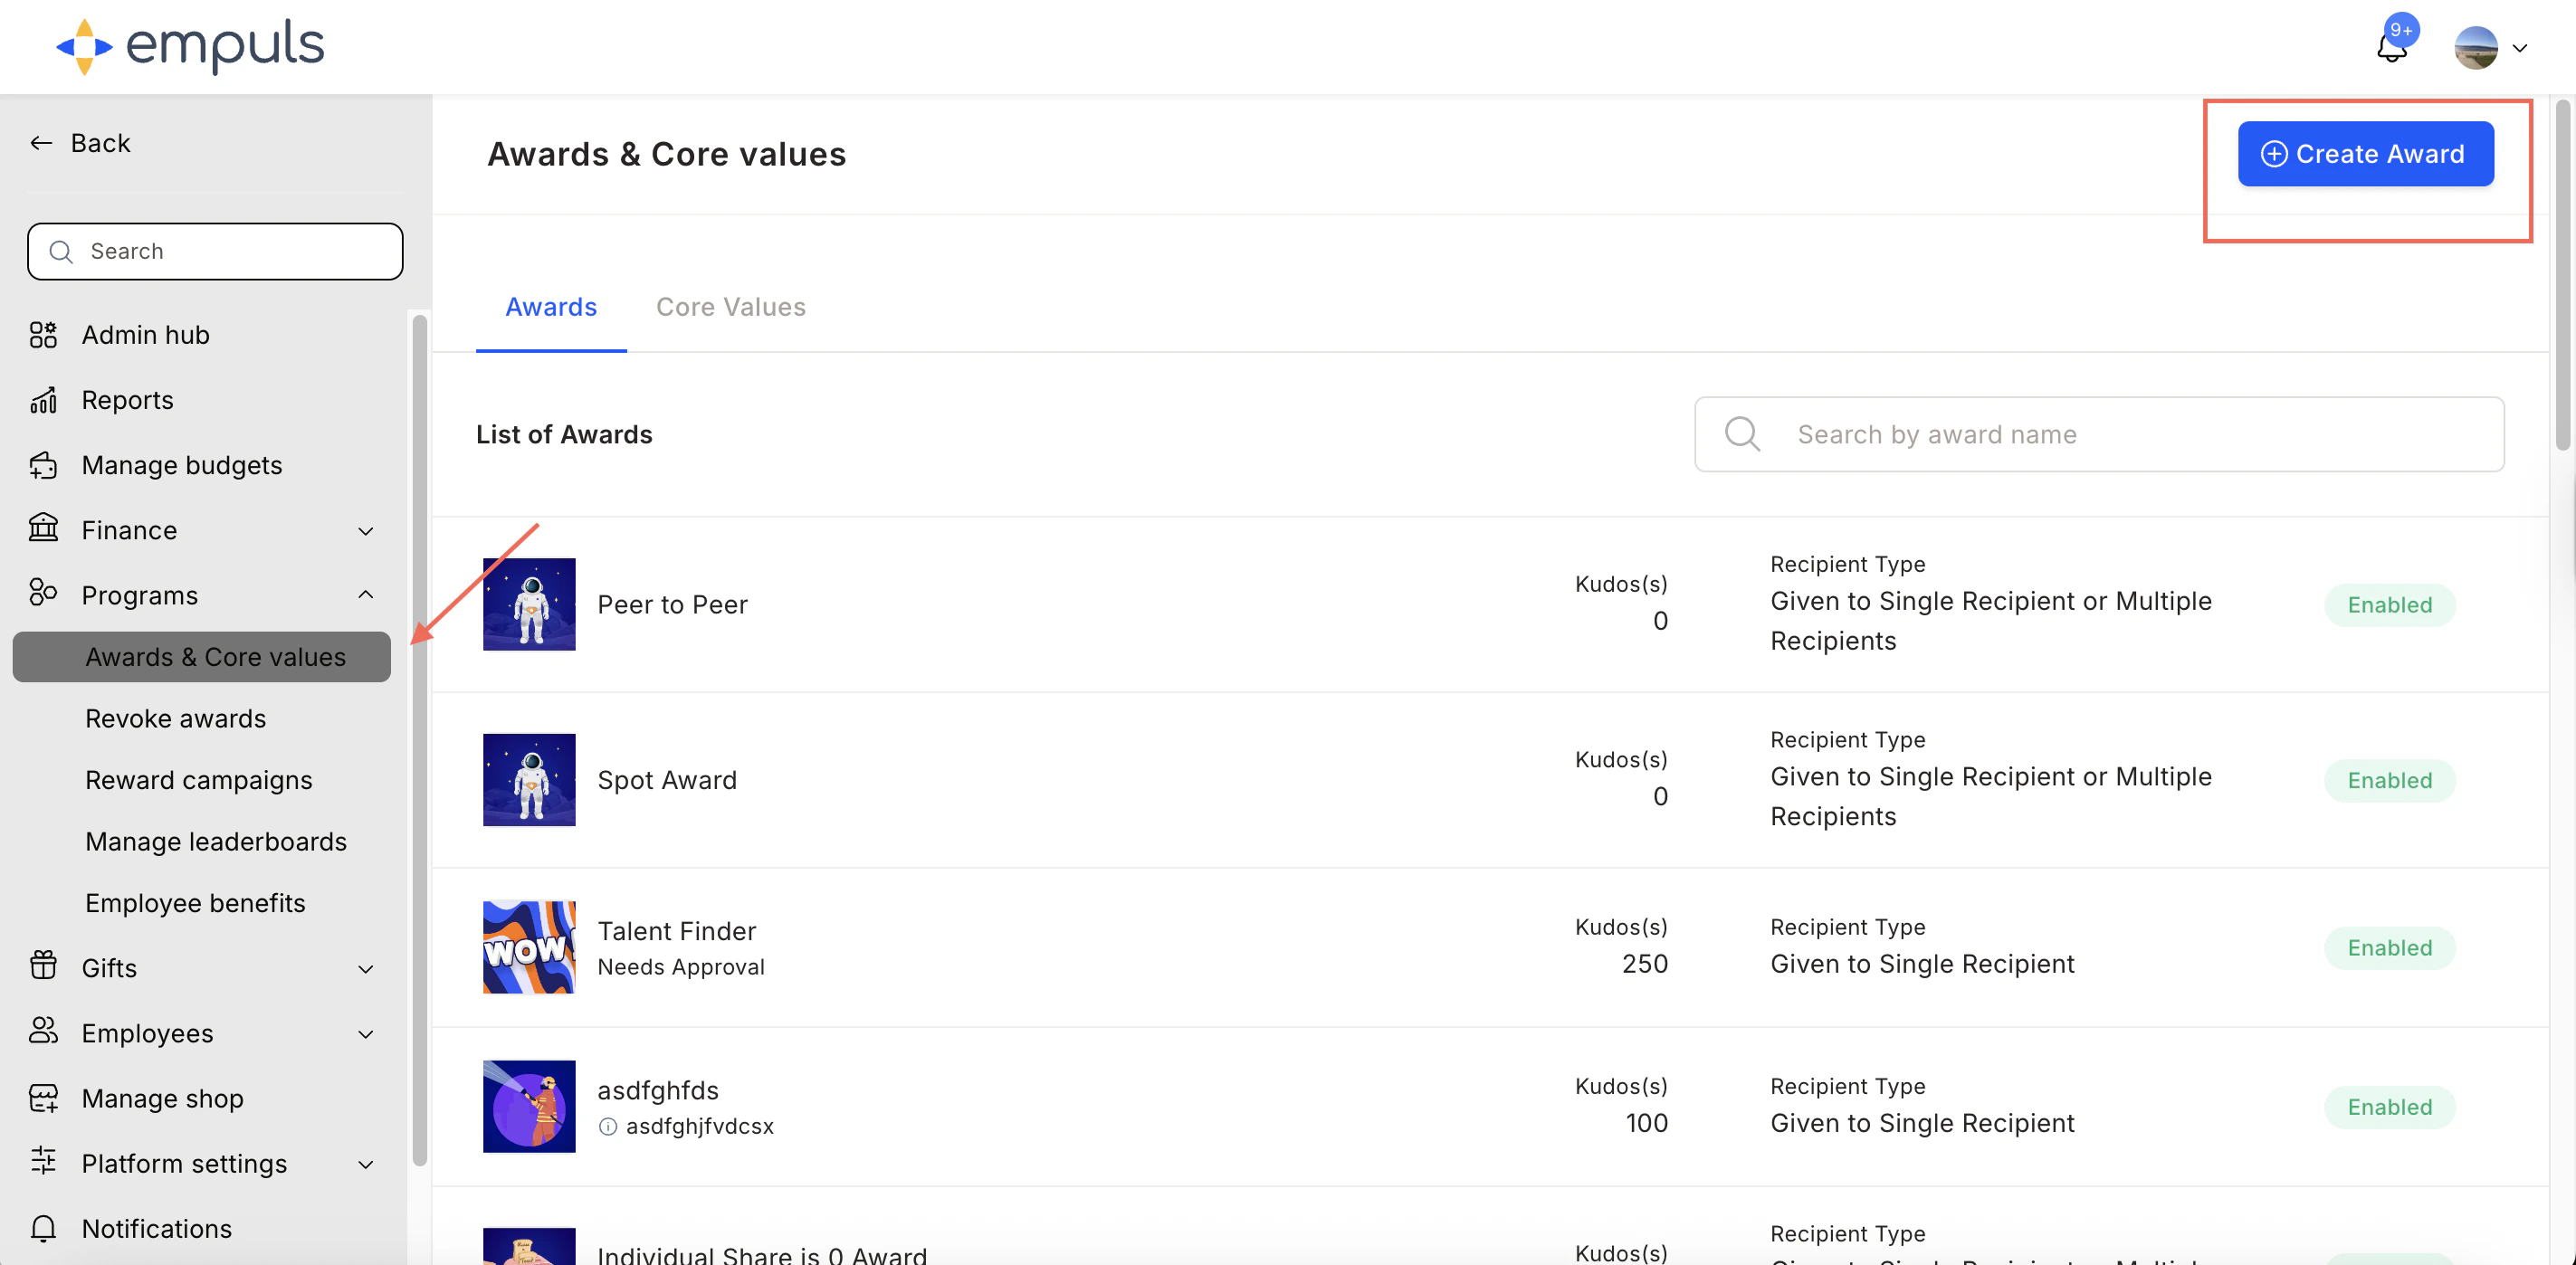
Navigate to the Admin Dashboard
Go to the Admin Dashboard by clicking Reports and Admin at the bottom of the left sidebar.
Select award type
Choose the award type: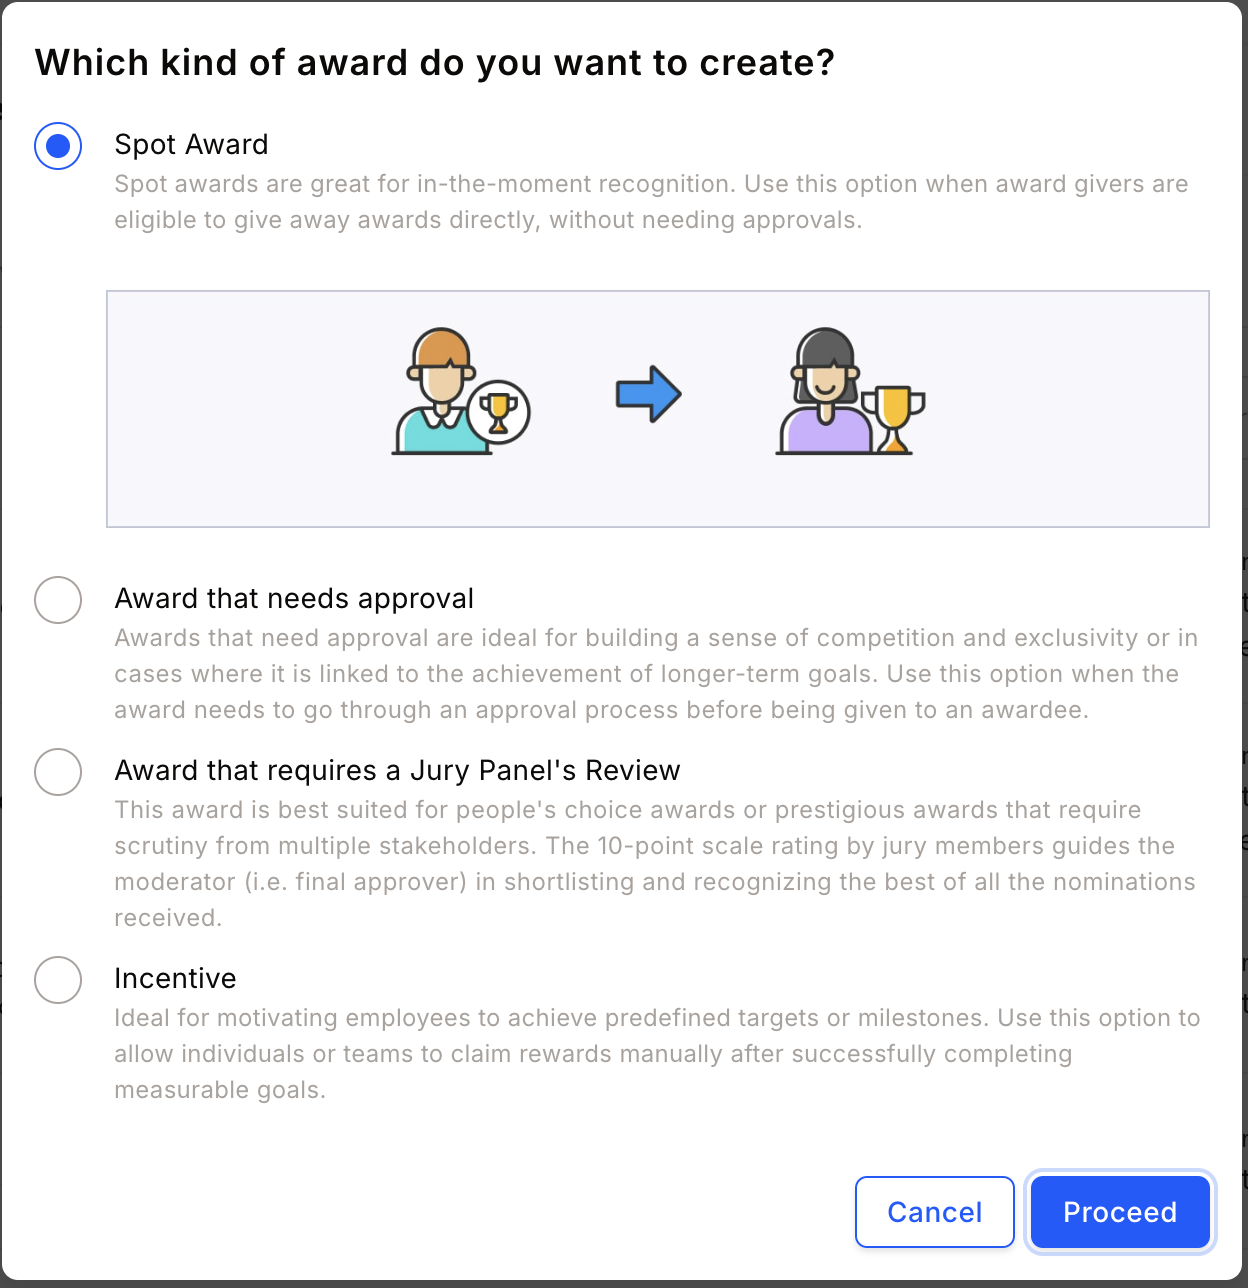
- Spot Award — Instantly recognise outstanding performance without prior approval.
- Award that needs approval — Best for high-value awards linked to long-term goals. Goes through an approval process before being given.
- Award that requires a Jury Panel’s review — For recognising outstanding achievements or setting up a people’s choice award. A 10-point scale jury rating guides the moderator in shortlisting nominations.
- Incentives — Ideal for motivating employees to achieve predefined targets or milestones. Employees claim rewards manually after completing measurable goals.
Add award details
Fill in the award name, description, image, and recipient type, then click Continue.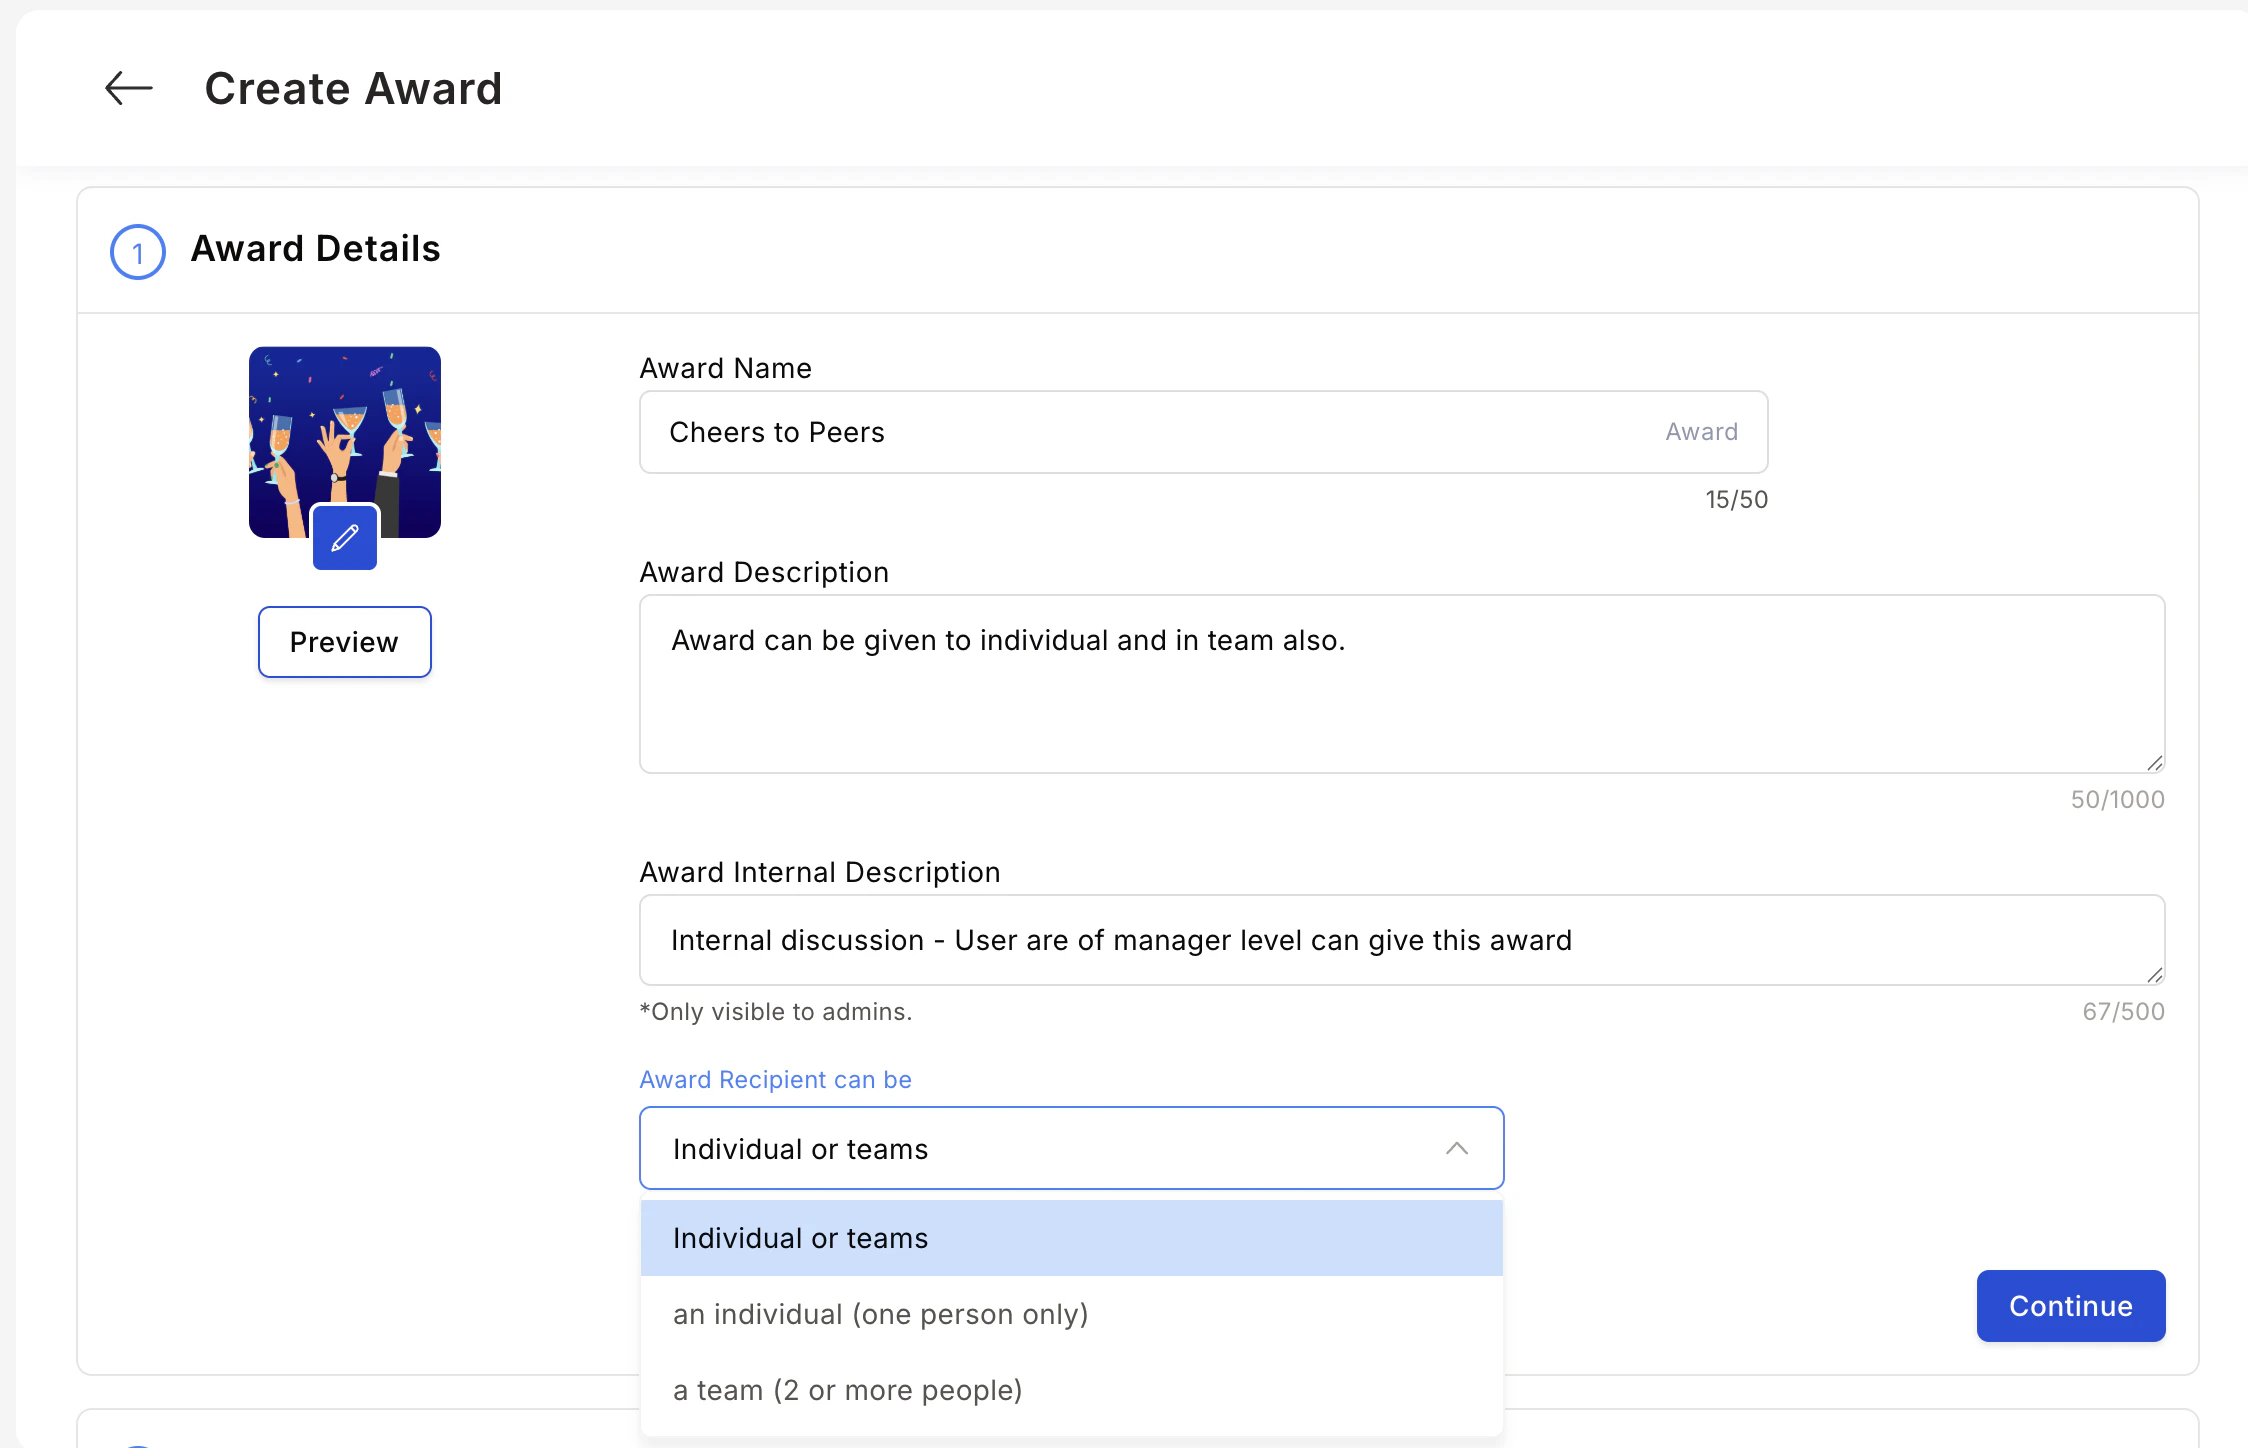
An award recipient can be an individual, a team, or kept flexible — letting the award presenter decide at the time of giving.
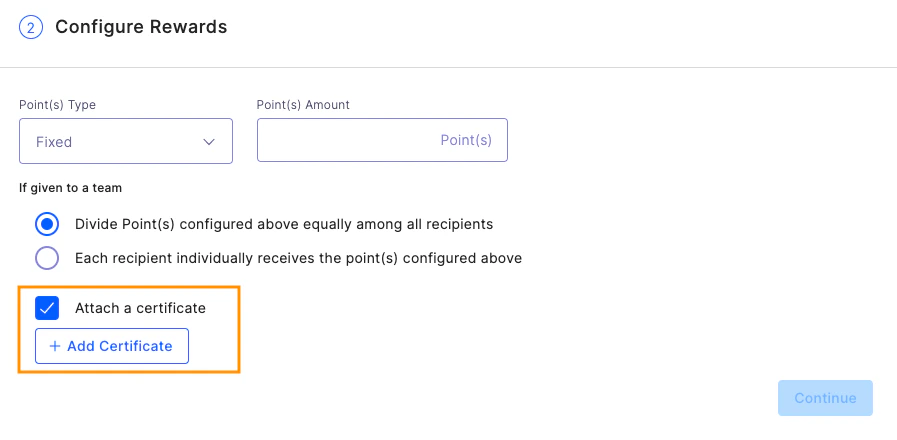
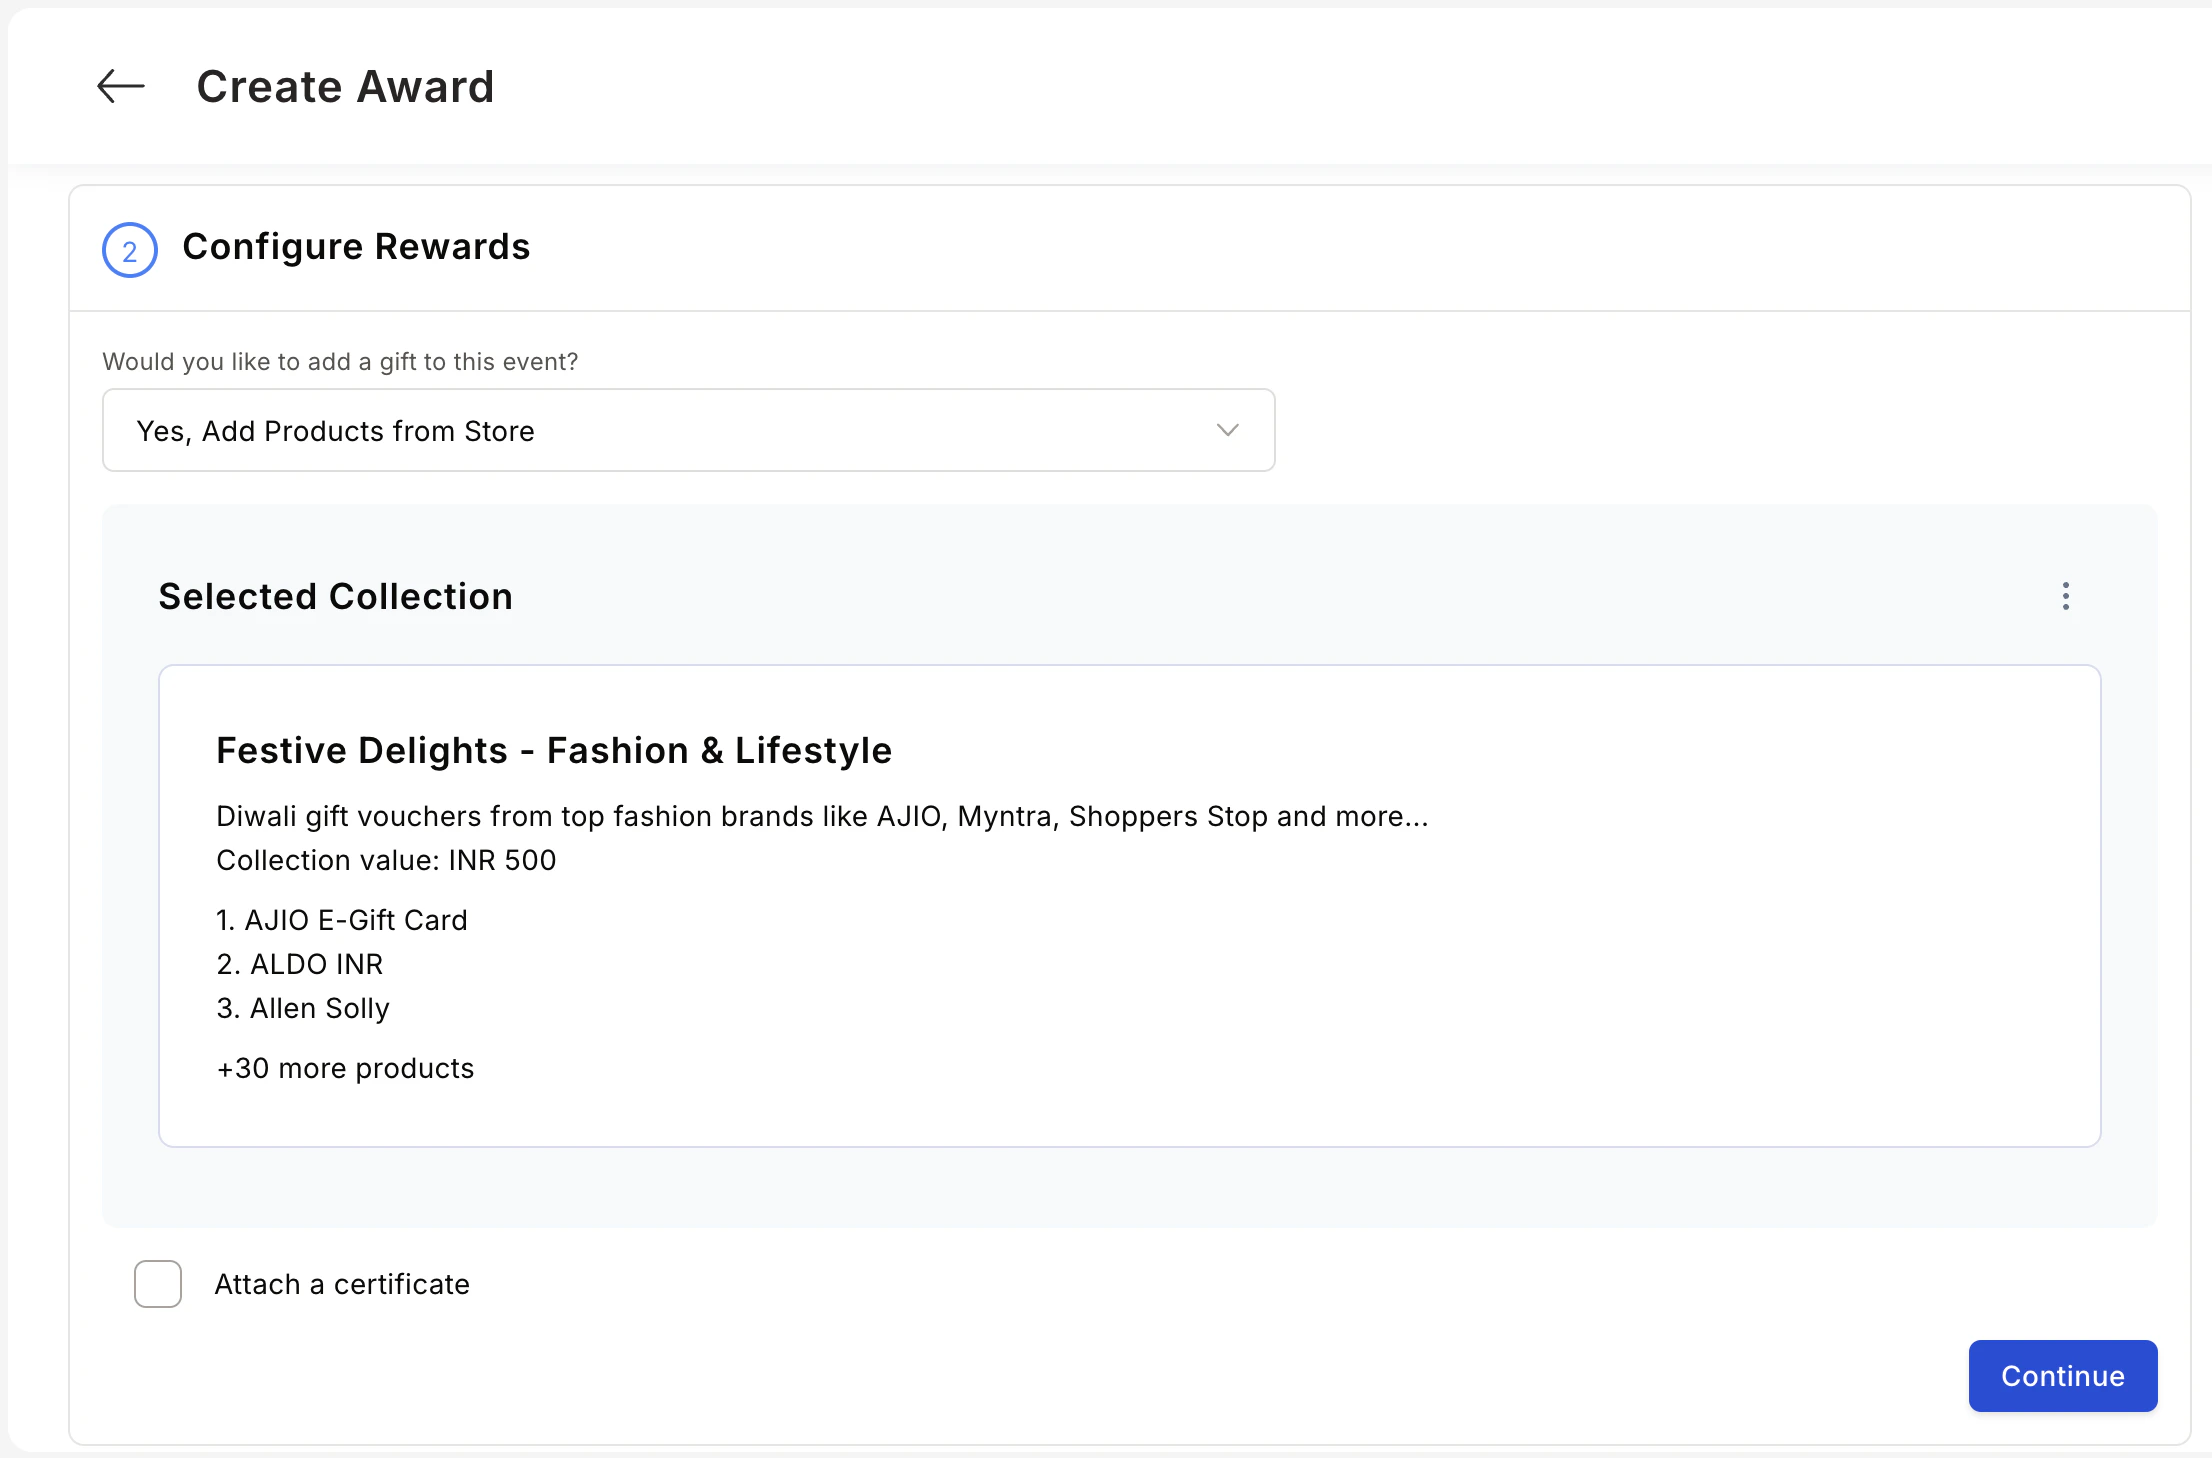
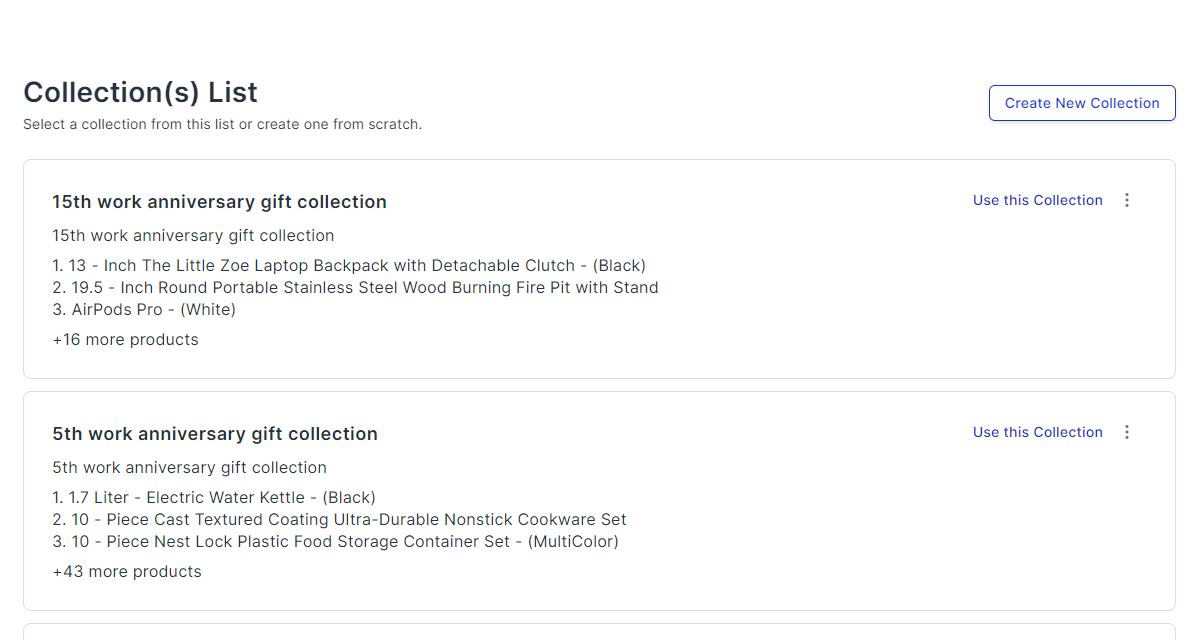
Configure the reward
Choose whether to reward points or gift cards and merchandise.For spot awards, points can be: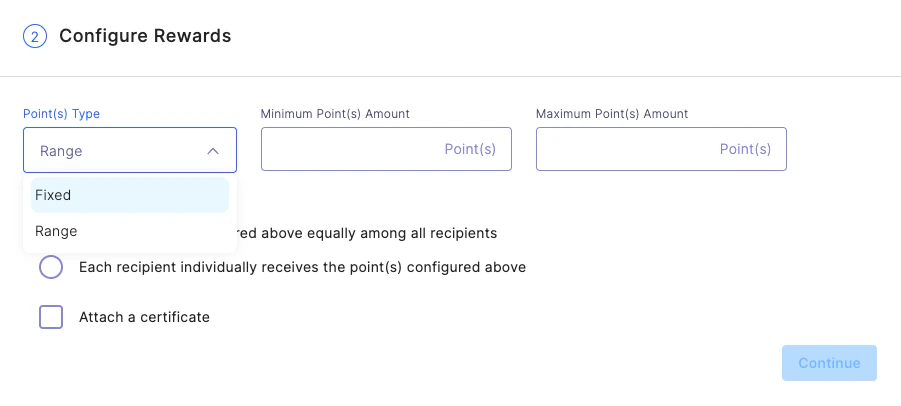
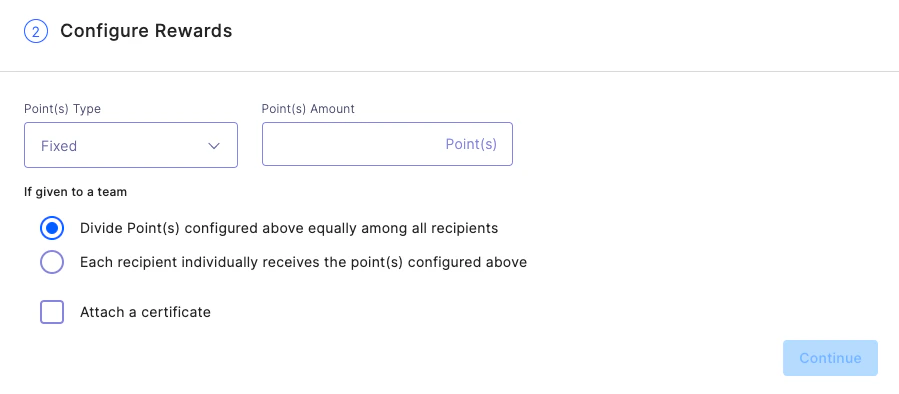
- Fixed — The same points every time; the presenter cannot modify the allocation.
- Range — The Super Admin sets a min/max range; the presenter allocates within that range.
- Distribute the configured points equally among all team members.
- Give each recipient the full configured points independently.
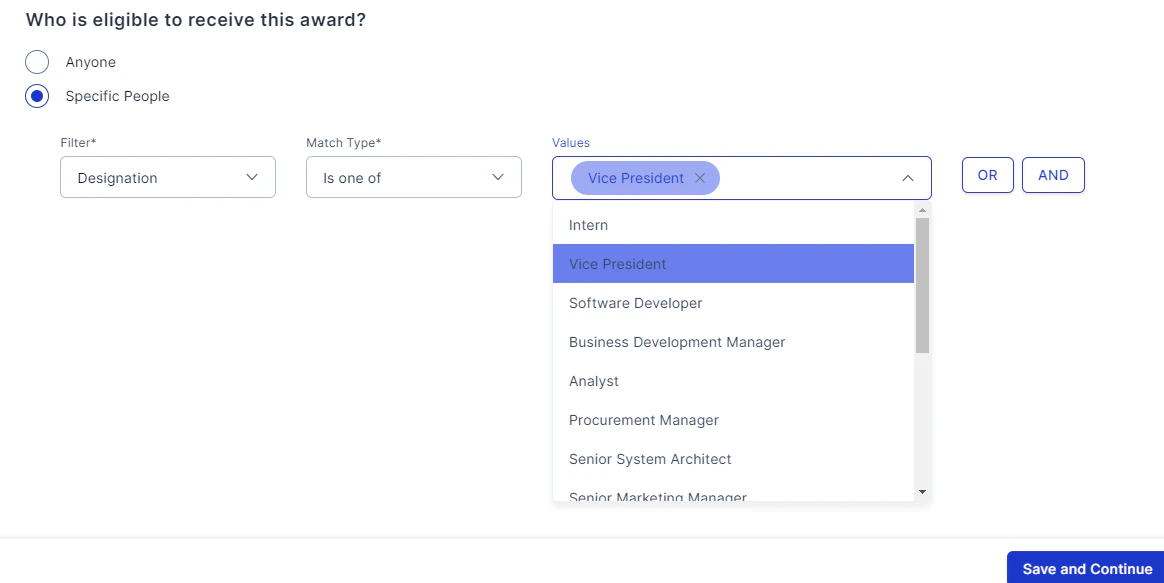
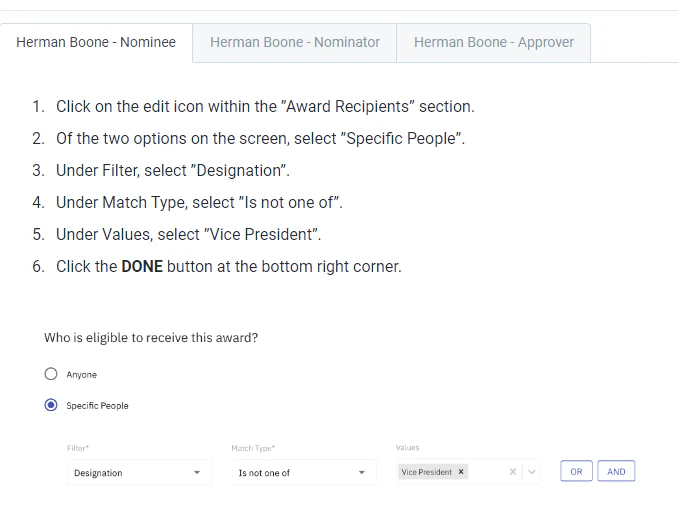
Define nominee, nominator, and approver eligibility
These settings allow you to award anyone or restrict awards to specific user groups.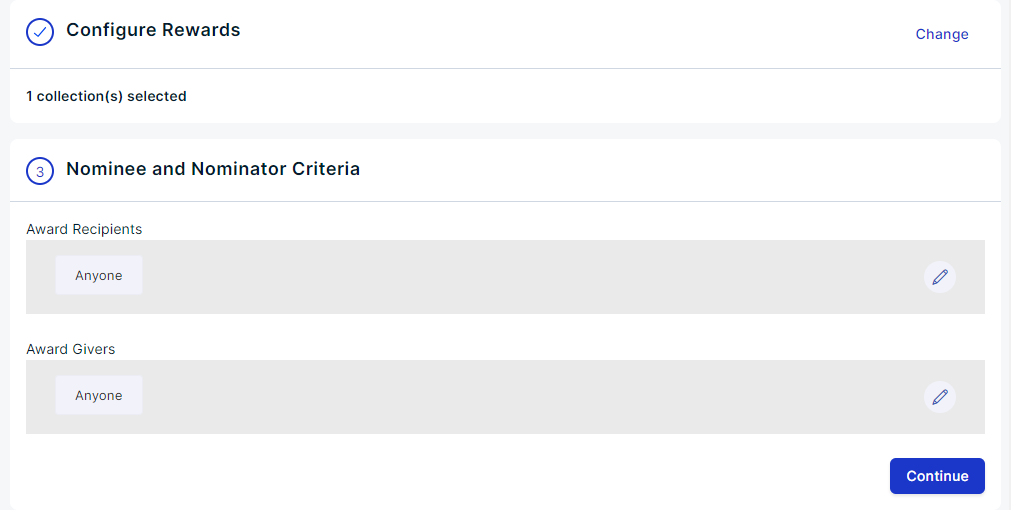

Configure advanced settings
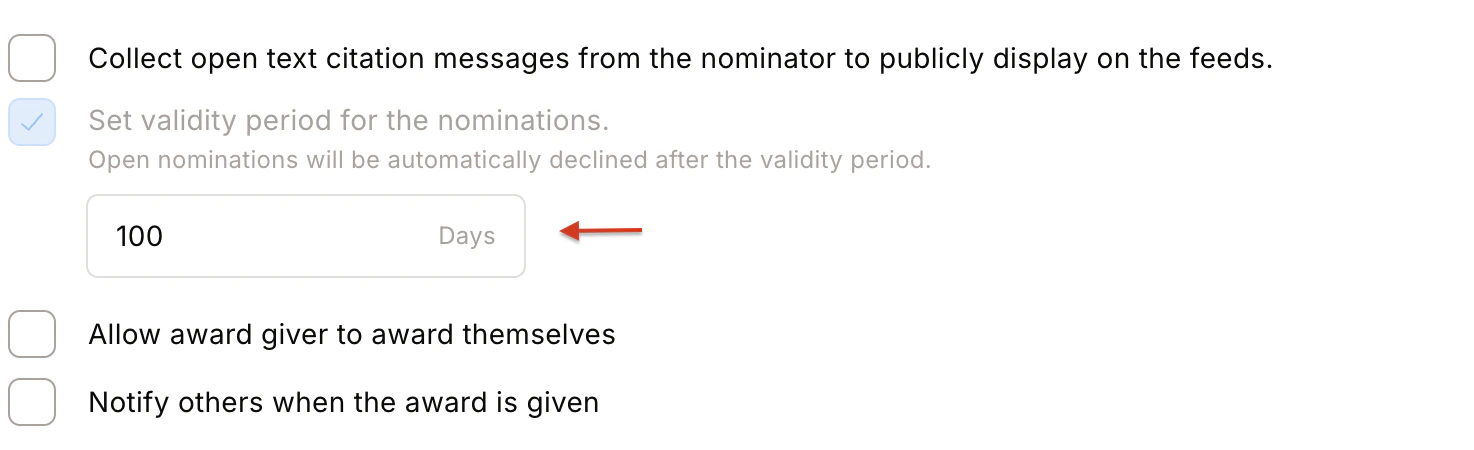
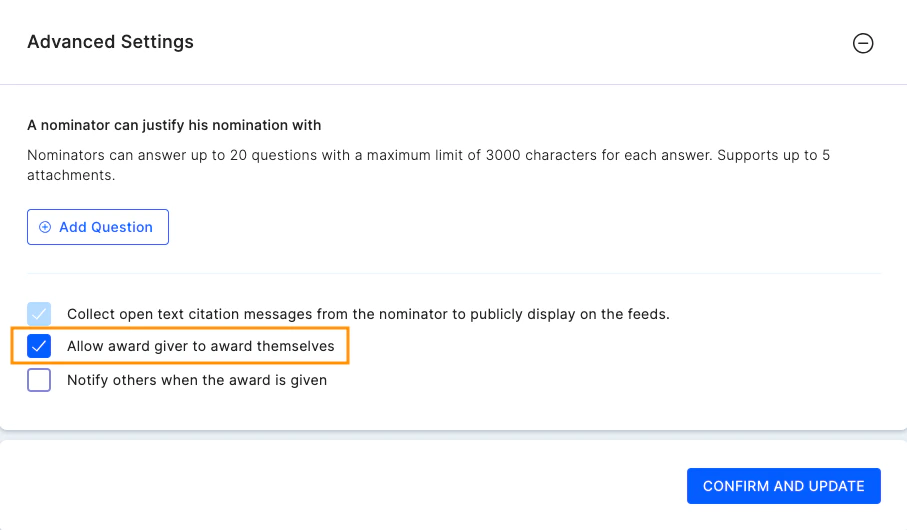
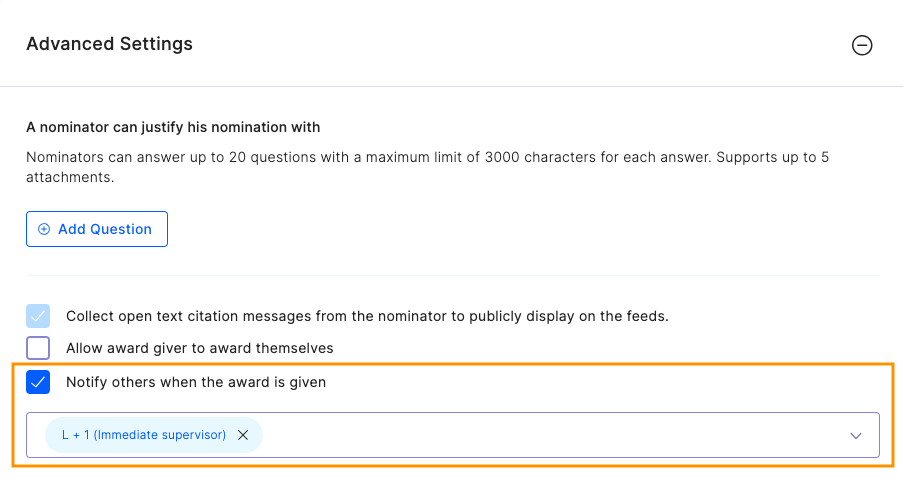
A. Set Questions for Nominator — Create up to 20 questions (multiple-choice or short text) that nominators must answer. If a question is text-based and mandatory, you can also mark an attachment as mandatory.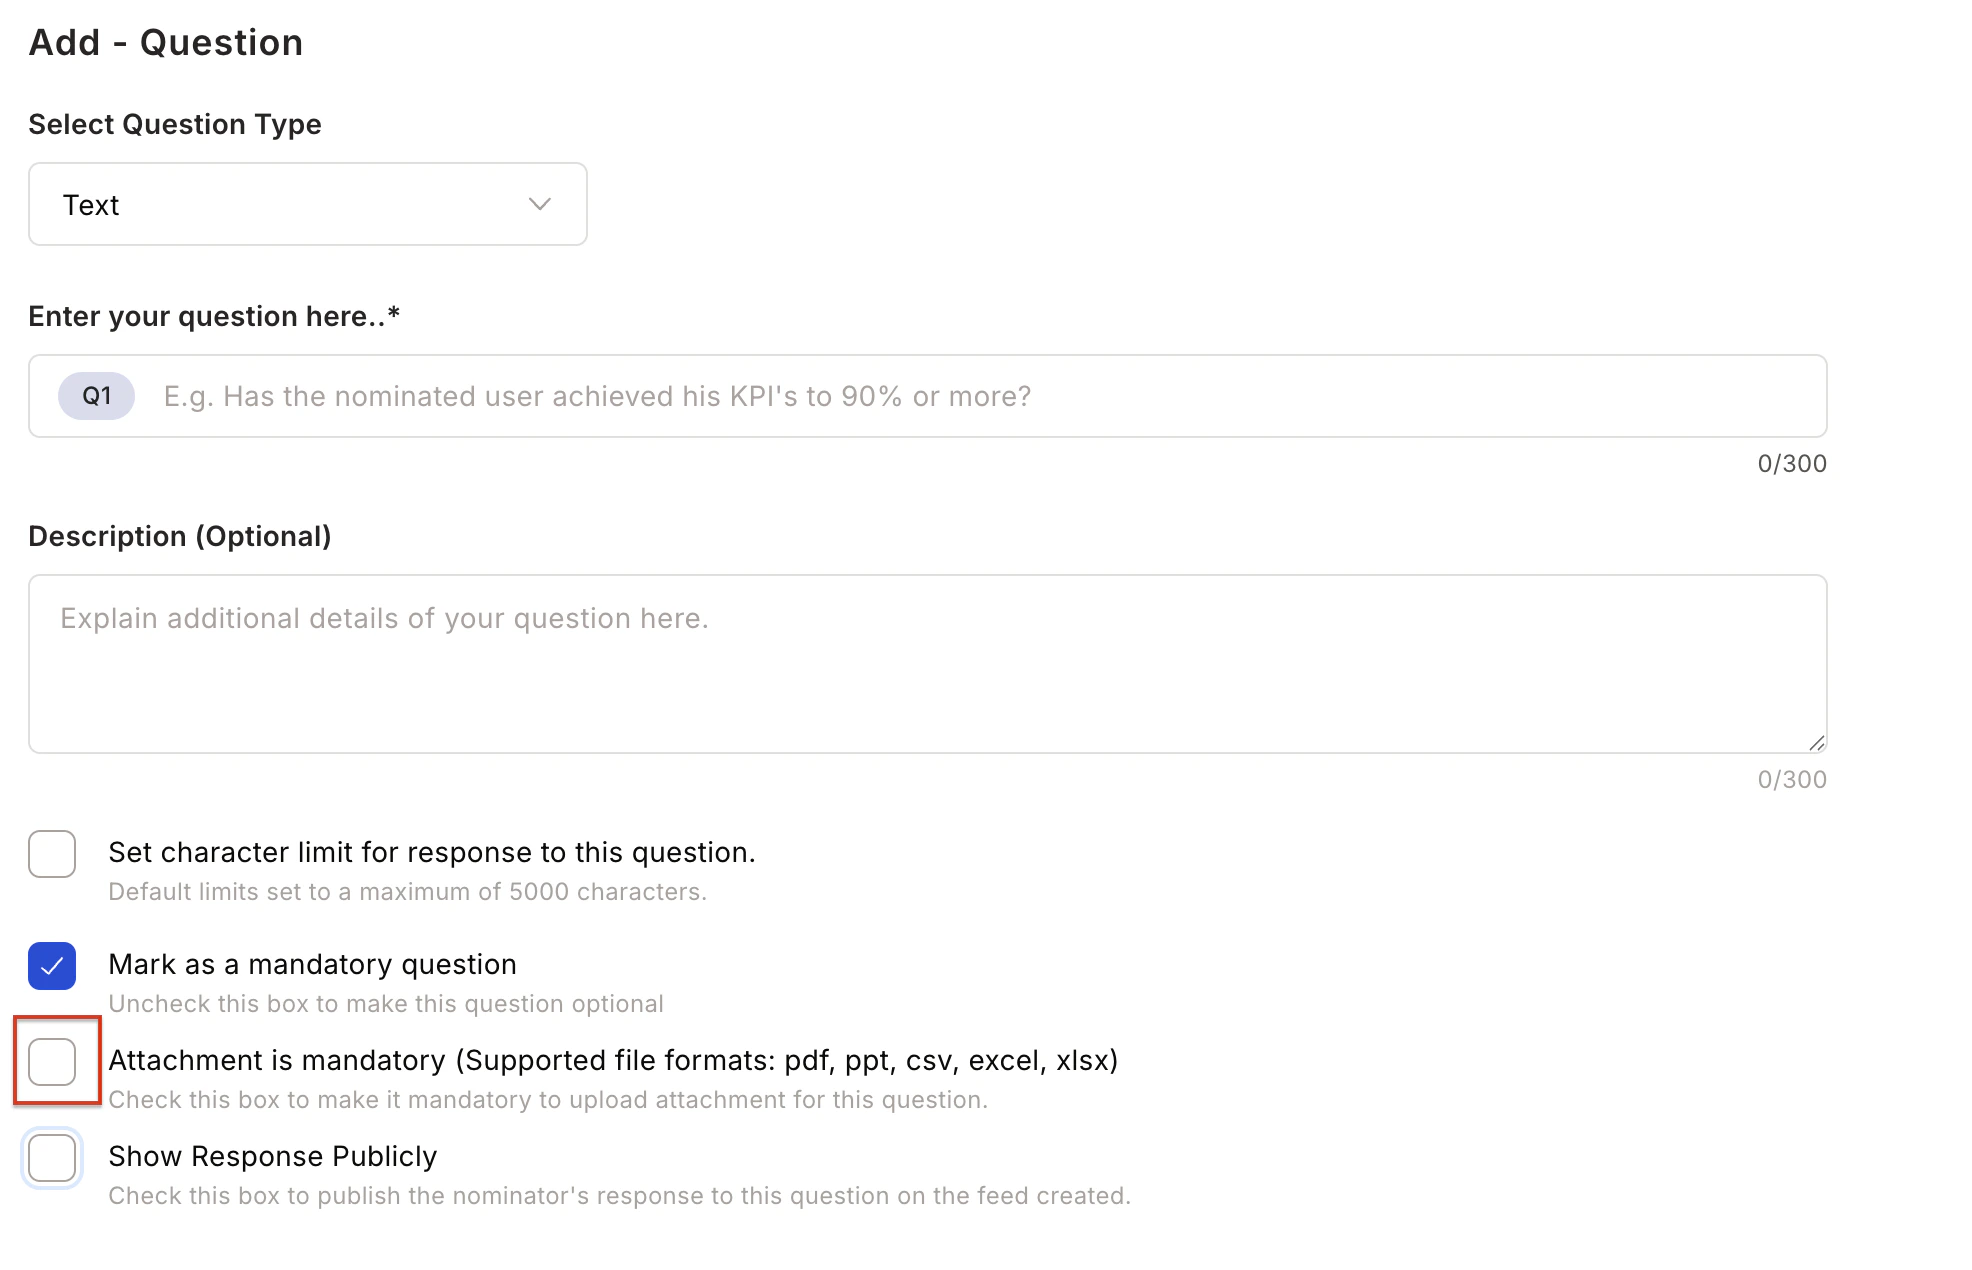
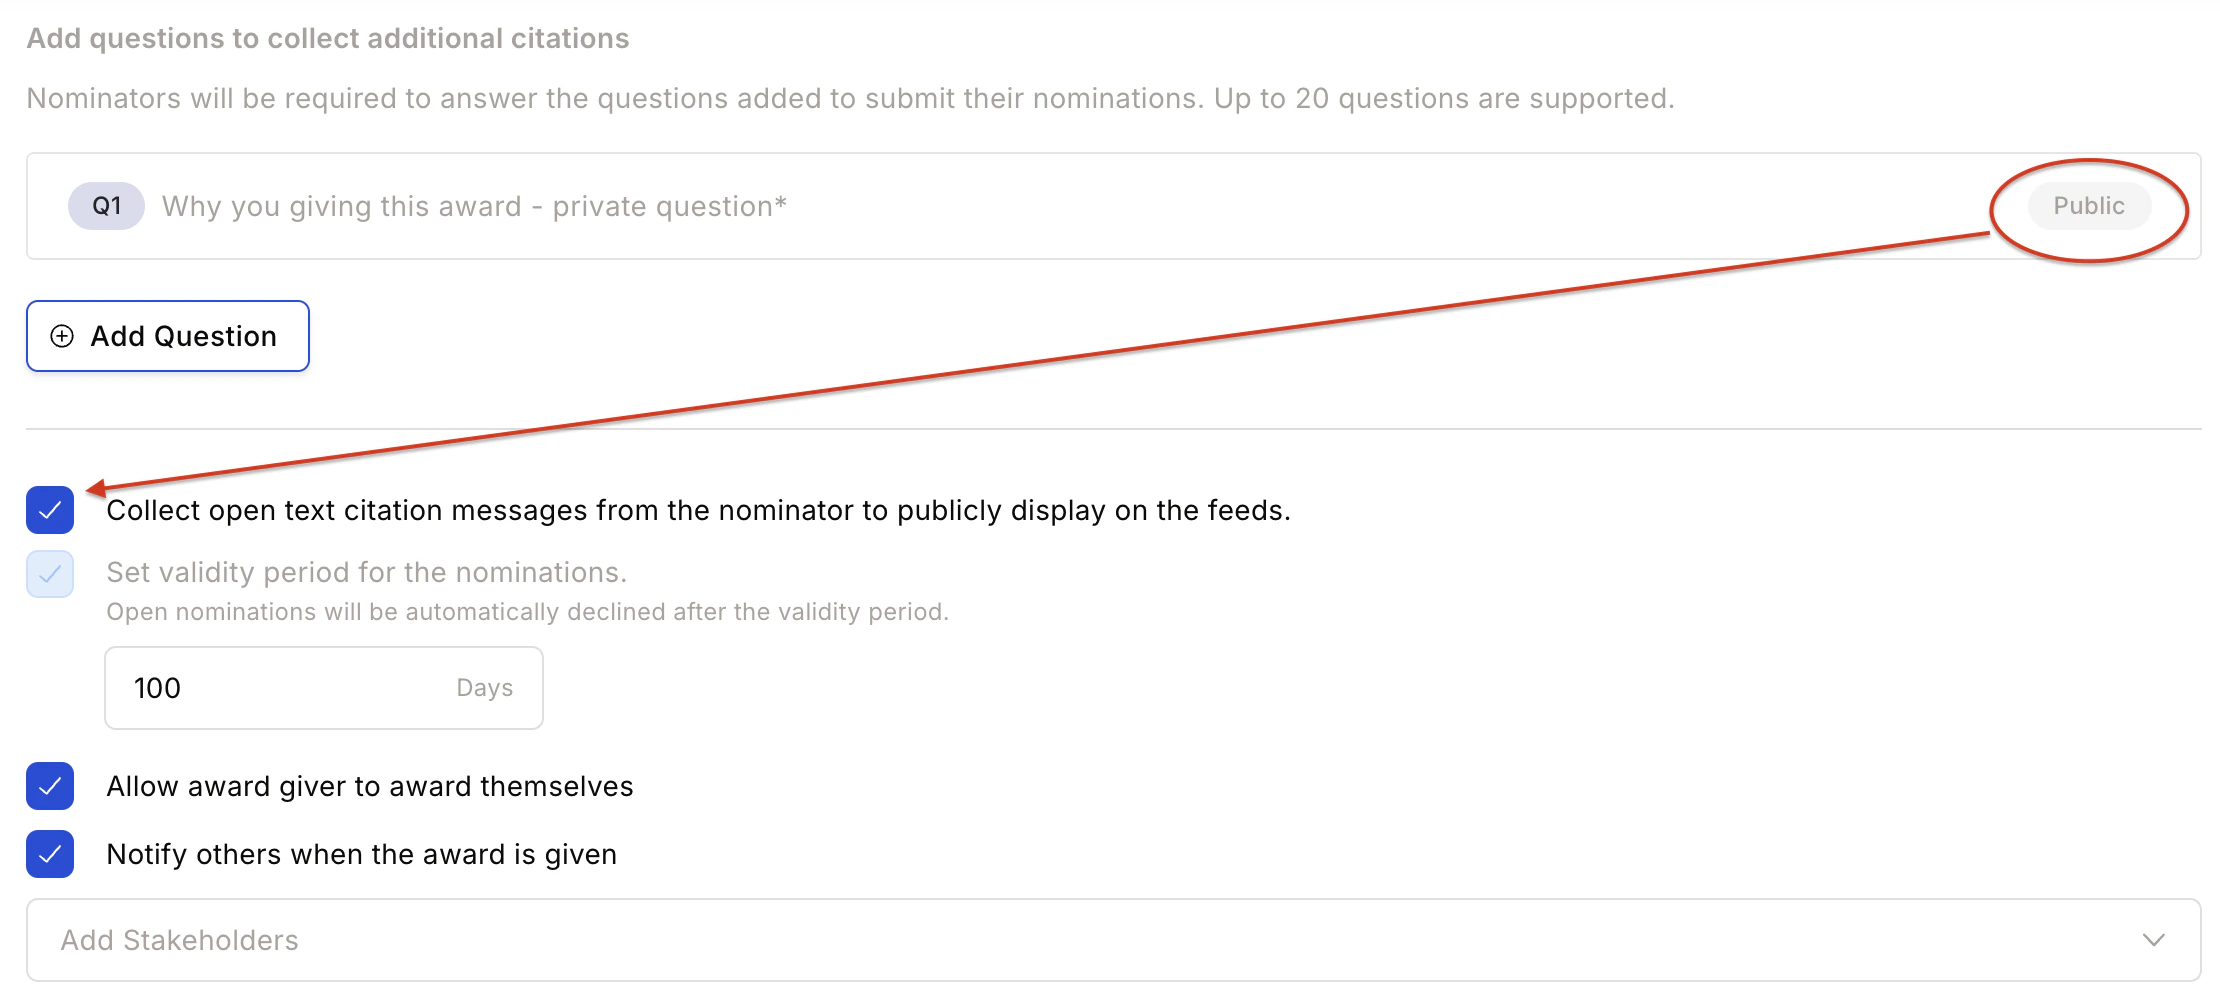
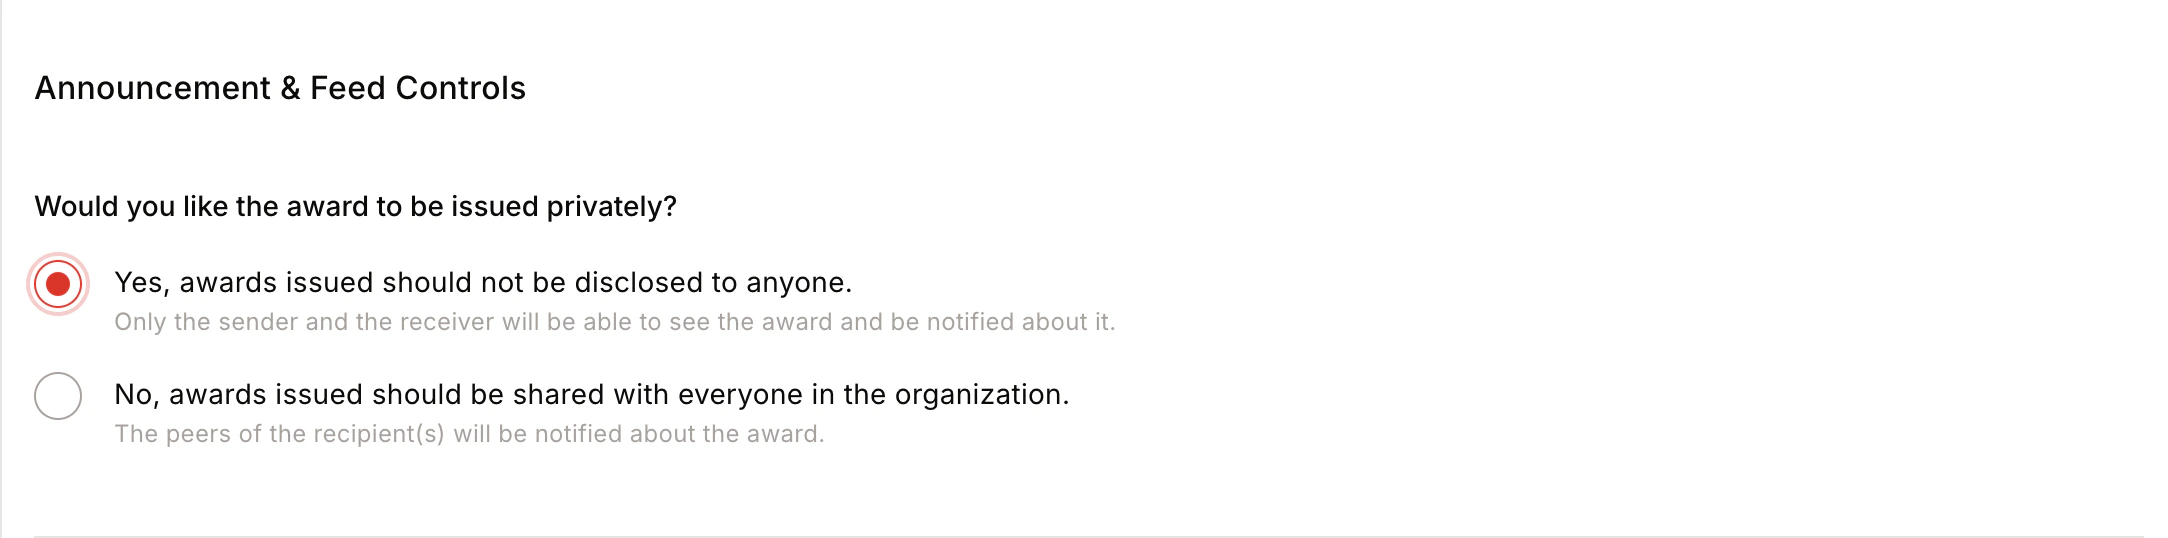
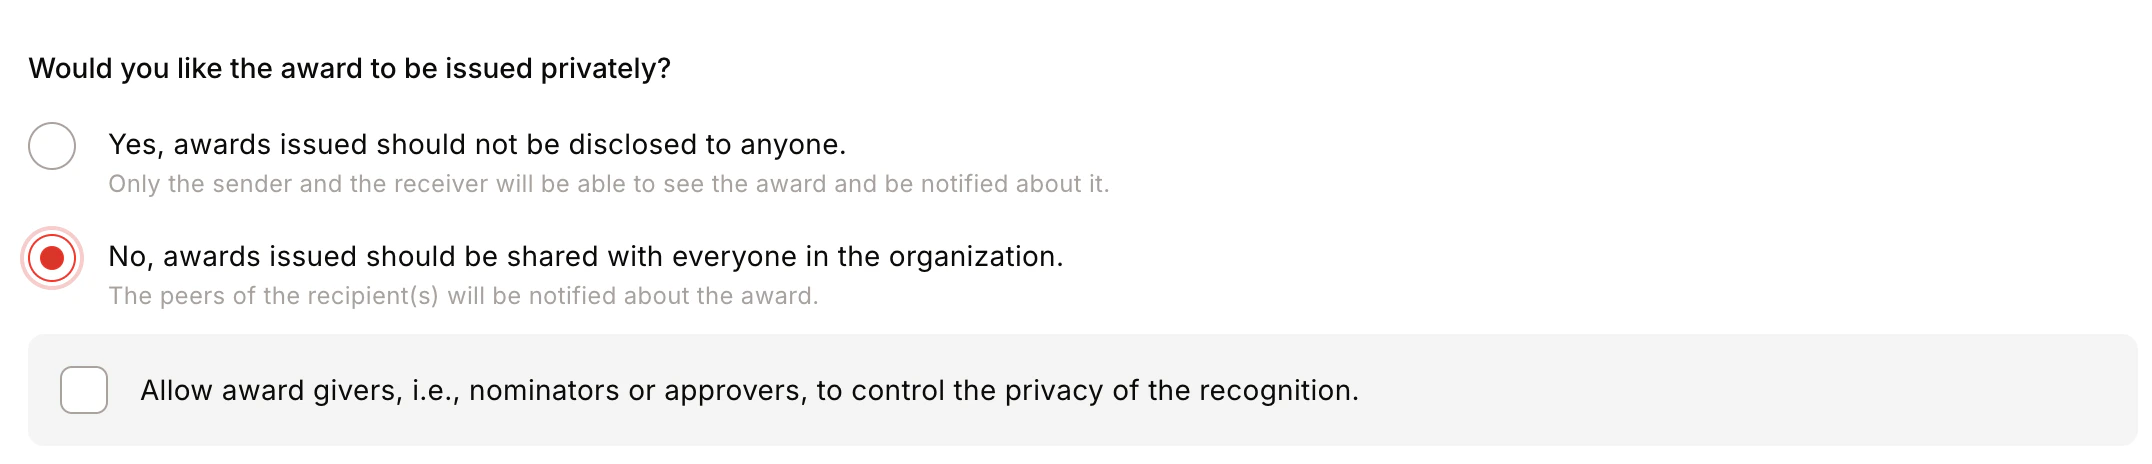

- Award Visibility — Post publicly on the feed, or keep private (only sender and receiver can view).
- You can also allow nominators/approvers to control visibility at the time of giving.
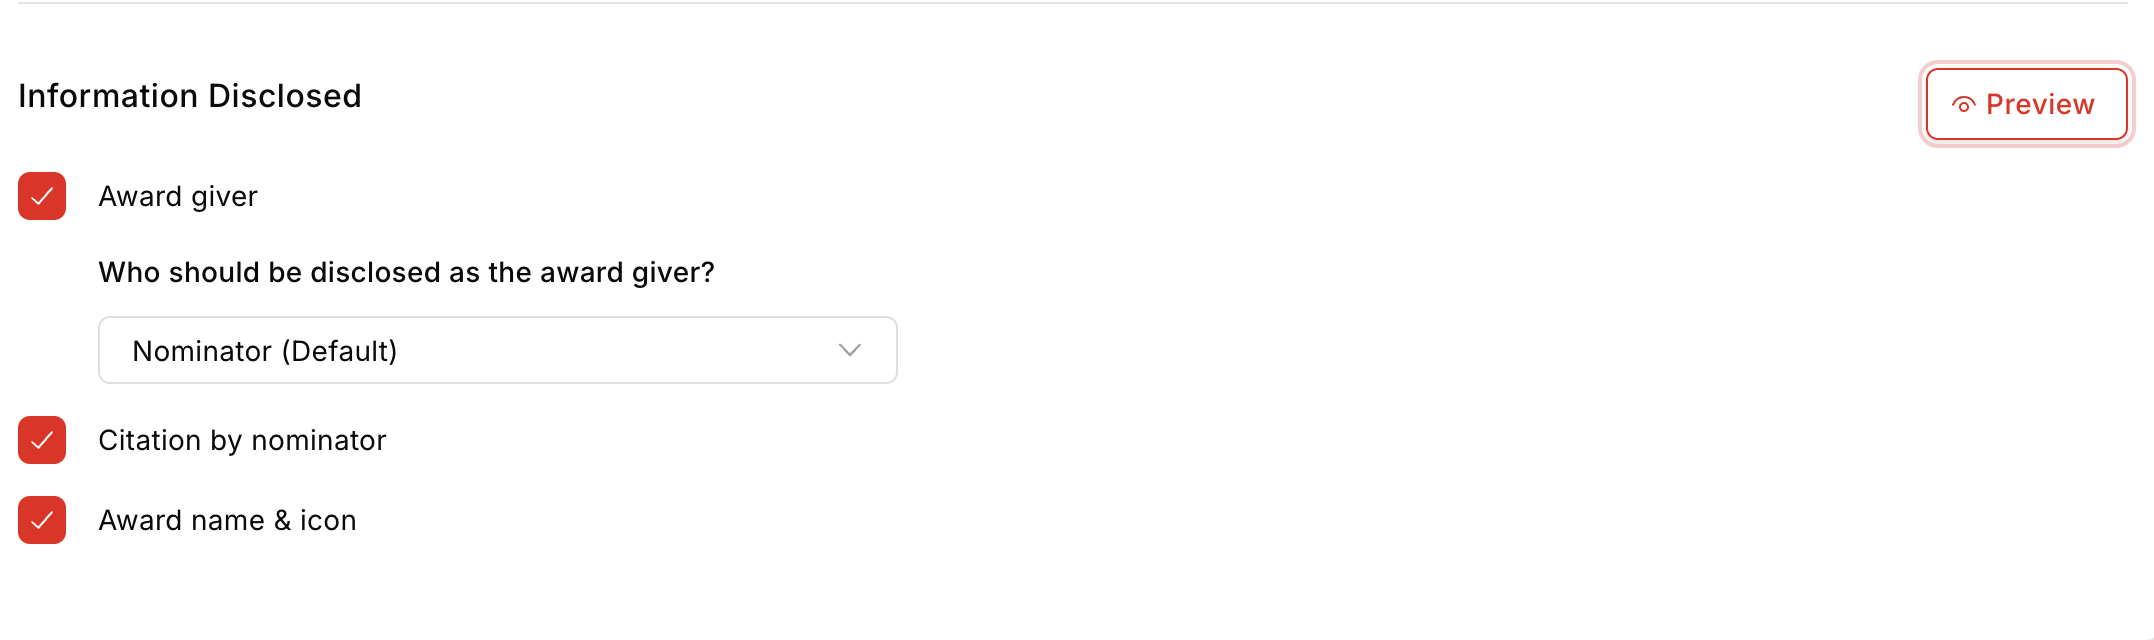
- Information Disclosed — Choose whether to show Award Giver, Citation by Nominator, and Award Name and Icon on the feed.
- Privacy Control:
- Centrally — Award is posted publicly and visible to all group members.
- Public — Award feed visible to all members of the group where it is posted.
- Private — Only the nominator and nominee can see the award feed.
- By Nominator/Approver — Privacy is set by the nominator or approver at the time of giving.
- Team Size — Minimum 1, maximum 50 members.
The awardee’s teammates are notified by email to crowdsource wishes for the award recipient.
- Use clear names and simple descriptions.
- Align award categories with business goals and company culture.
- Limit the number of active awards for better adoption and clarity.
- Combine automated triggers with manual nominations for balance.
- Use AI nudges and notifications to sustain participation.
Set up a reward budget
Once the award is created, assign a budget. Three options are available: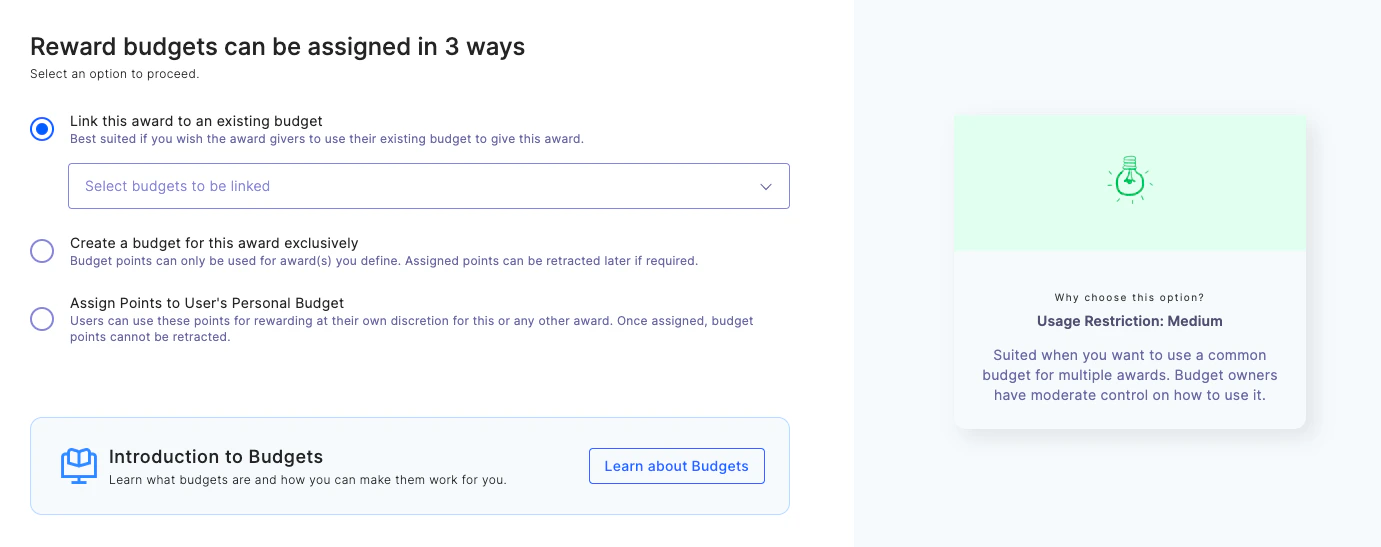
Navigate to the Admin Dashboard
Go to the Admin Dashboard by clicking Reports and Admin at the bottom of the left sidebar.
Select award type
Choose the award type:
- Spot Award — Instantly recognise outstanding performance without prior approval.
- Award that needs approval — Best for high-value awards linked to long-term goals. Goes through an approval process before being given.
- Award that requires a Jury Panel’s review — For recognising outstanding achievements or setting up a people’s choice award. A 10-point scale jury rating guides the moderator in shortlisting nominations.
- Incentives — Ideal for motivating employees to achieve predefined targets or milestones. Employees claim rewards manually after completing measurable goals.
Add award details
Fill in the award name, description, image, and recipient type, then click Continue.
An award recipient can be an individual, a team, or kept flexible — letting the award presenter decide at the time of giving.
Configure the reward
Choose whether to reward points or gift cards and merchandise.For spot awards, points can be:
- Fixed — The same points every time; the presenter cannot modify the allocation.
- Range — The Super Admin sets a min/max range; the presenter allocates within that range.
- Distribute the configured points equally among all team members.
- Give each recipient the full configured points independently.
Define nominee, nominator, and approver eligibility
These settings allow you to award anyone or restrict awards to specific user groups.
Configure advanced settings
A. Set Questions for Nominator — Create up to 20 questions (multiple-choice or short text) that nominators must answer. If a question is text-based and mandatory, you can also mark an attachment as mandatory.
- Award Visibility — Post publicly on the feed, or keep private (only sender and receiver can view).
- You can also allow nominators/approvers to control visibility at the time of giving.
- Information Disclosed — Choose whether to show Award Giver, Citation by Nominator, and Award Name and Icon on the feed.
- Privacy Control:
- Centrally — Award is posted publicly and visible to all group members.
- Public — Award feed visible to all members of the group where it is posted.
- Private — Only the nominator and nominee can see the award feed.
- By Nominator/Approver — Privacy is set by the nominator or approver at the time of giving.
- Team Size — Minimum 1, maximum 50 members.
The awardee’s teammates are notified by email to crowdsource wishes for the award recipient.
- Use clear names and simple descriptions.
- Align award categories with business goals and company culture.
- Limit the number of active awards for better adoption and clarity.
- Combine automated triggers with manual nominations for balance.
- Use AI nudges and notifications to sustain participation.
Set up a reward budget
Once the award is created, assign a budget. Three options are available:A. Link the award to an existing budget
Best when using a shared budget across multiple awards. Available only if you have previously set up awards in Empuls.B. Create an exclusive budget for this award
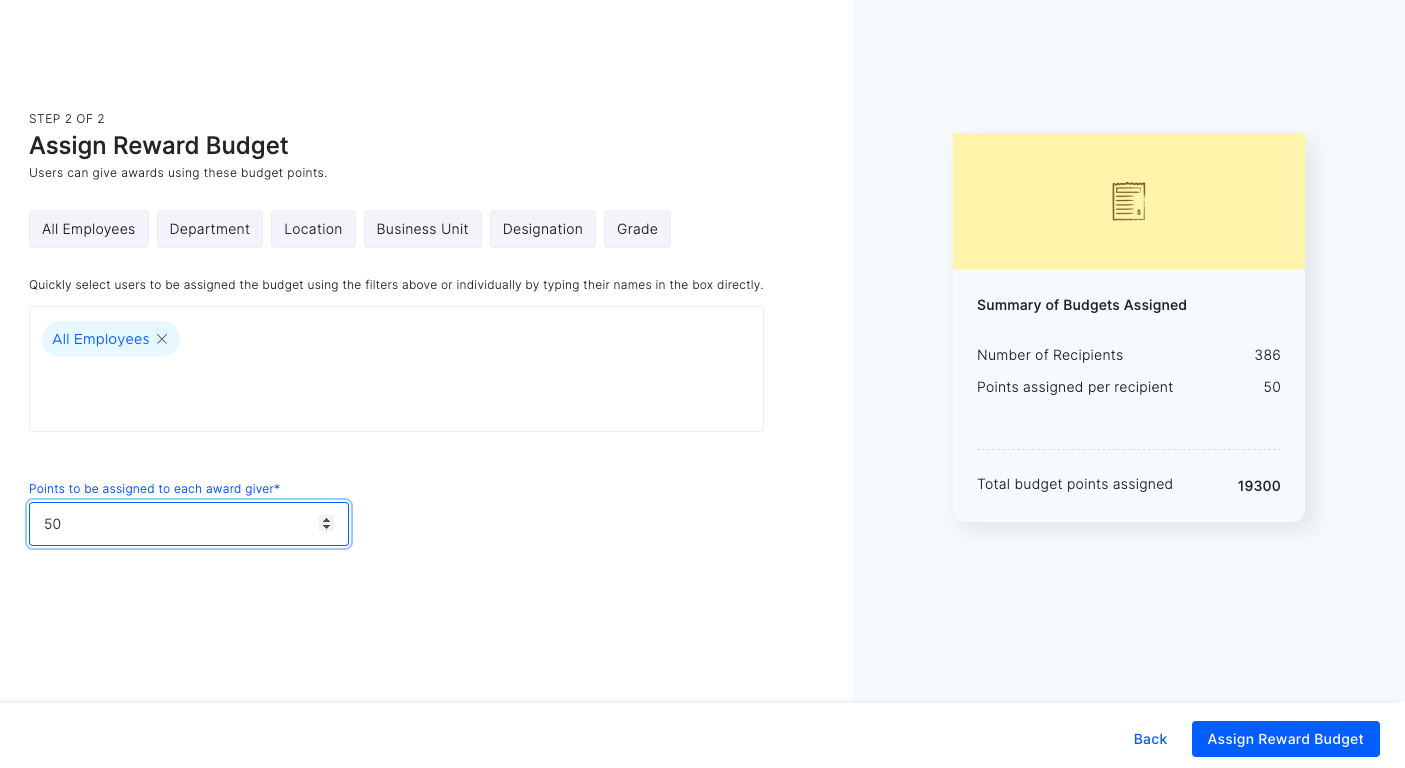
Use when you want to restrict budget usage exclusively to this award.- Create a new budget with a name and description. Set a validity period to retract unused points if needed. Click Next.

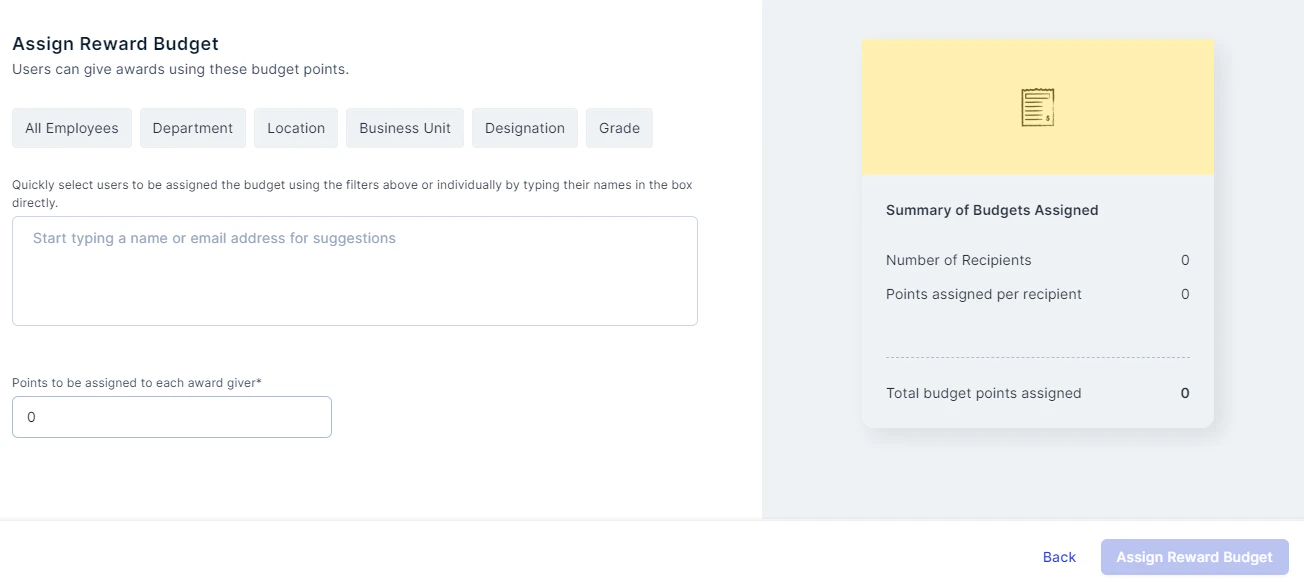
- Assign budget points to users individually or by filter. Preview the budget summary on the right and click Assign Reward Budget.
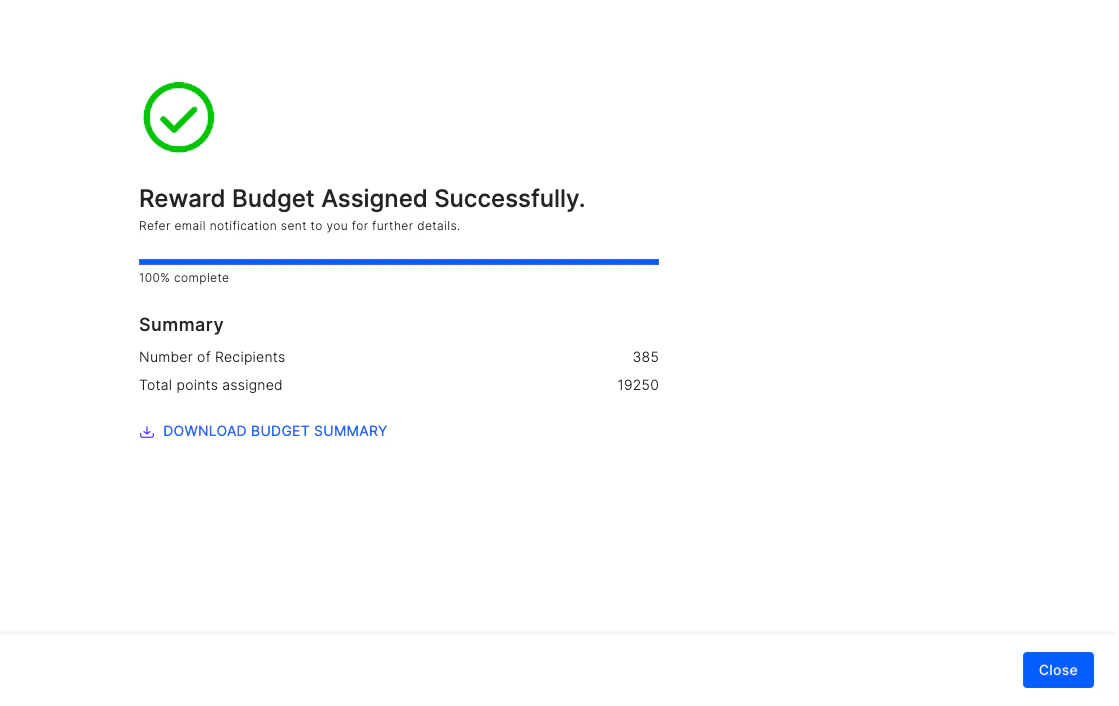
- Once points are distributed, you’ll receive a confirmation summary. Click Close to complete.
C. Assign points to the user’s personal budget
Best when you want budget owners to use points for any award.- Assign budget points to users individually or by filter. Preview the summary and click Assign Reward Budget.
- Once distributed, you’ll receive a confirmation summary. Click Close. You can also download the summary for your records.
Edit an award
Navigate to Programs > Awards & Core Values, hover over an award, and click the edit icon. Make your changes and click Confirm and Update to save.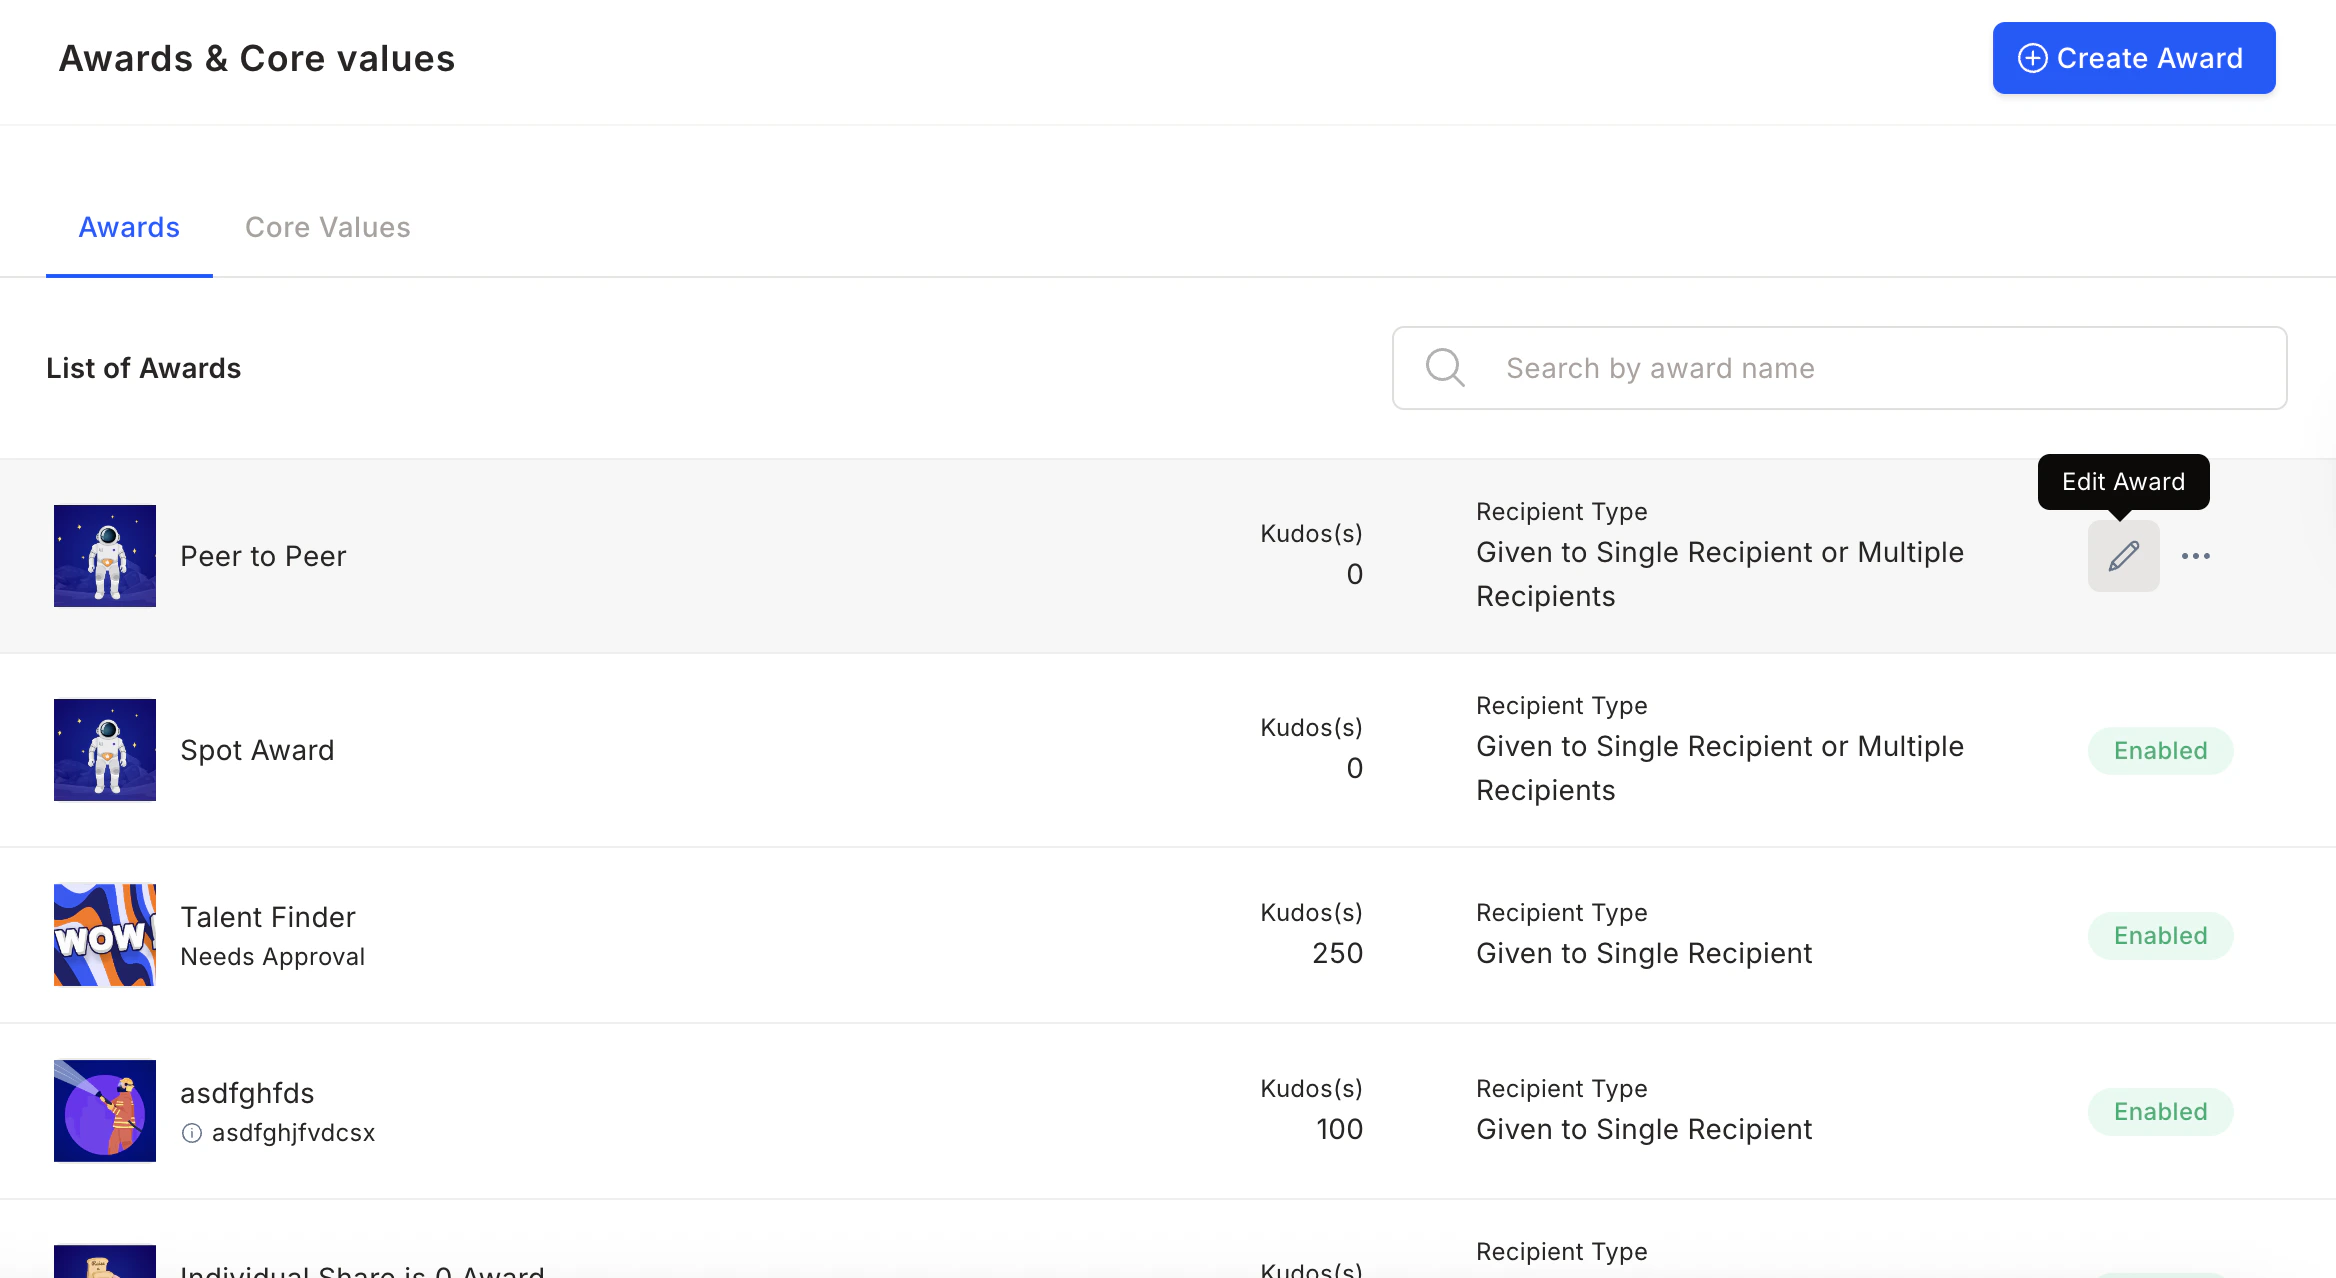
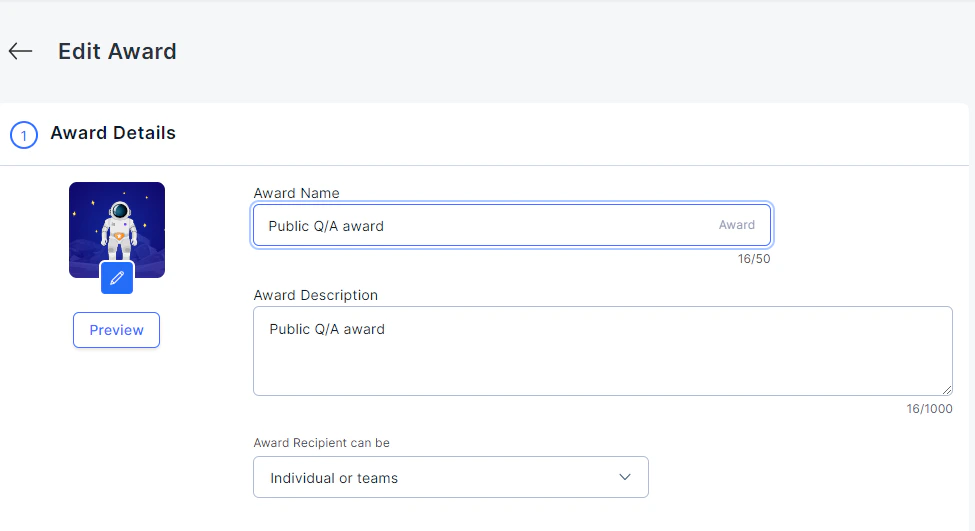
The award type cannot be changed after creation.
Additional award settings
Navigate to Programs > Awards & Core Values, hover over an award, and click the three-dot icon to:- Enable/disable — Disabled awards can no longer be nominated for, but existing nominations remain active.
- Make a copy — Duplicate an award’s configuration.
- Delete — Removes the award from the interface. Past data and pending nominations remain intact.
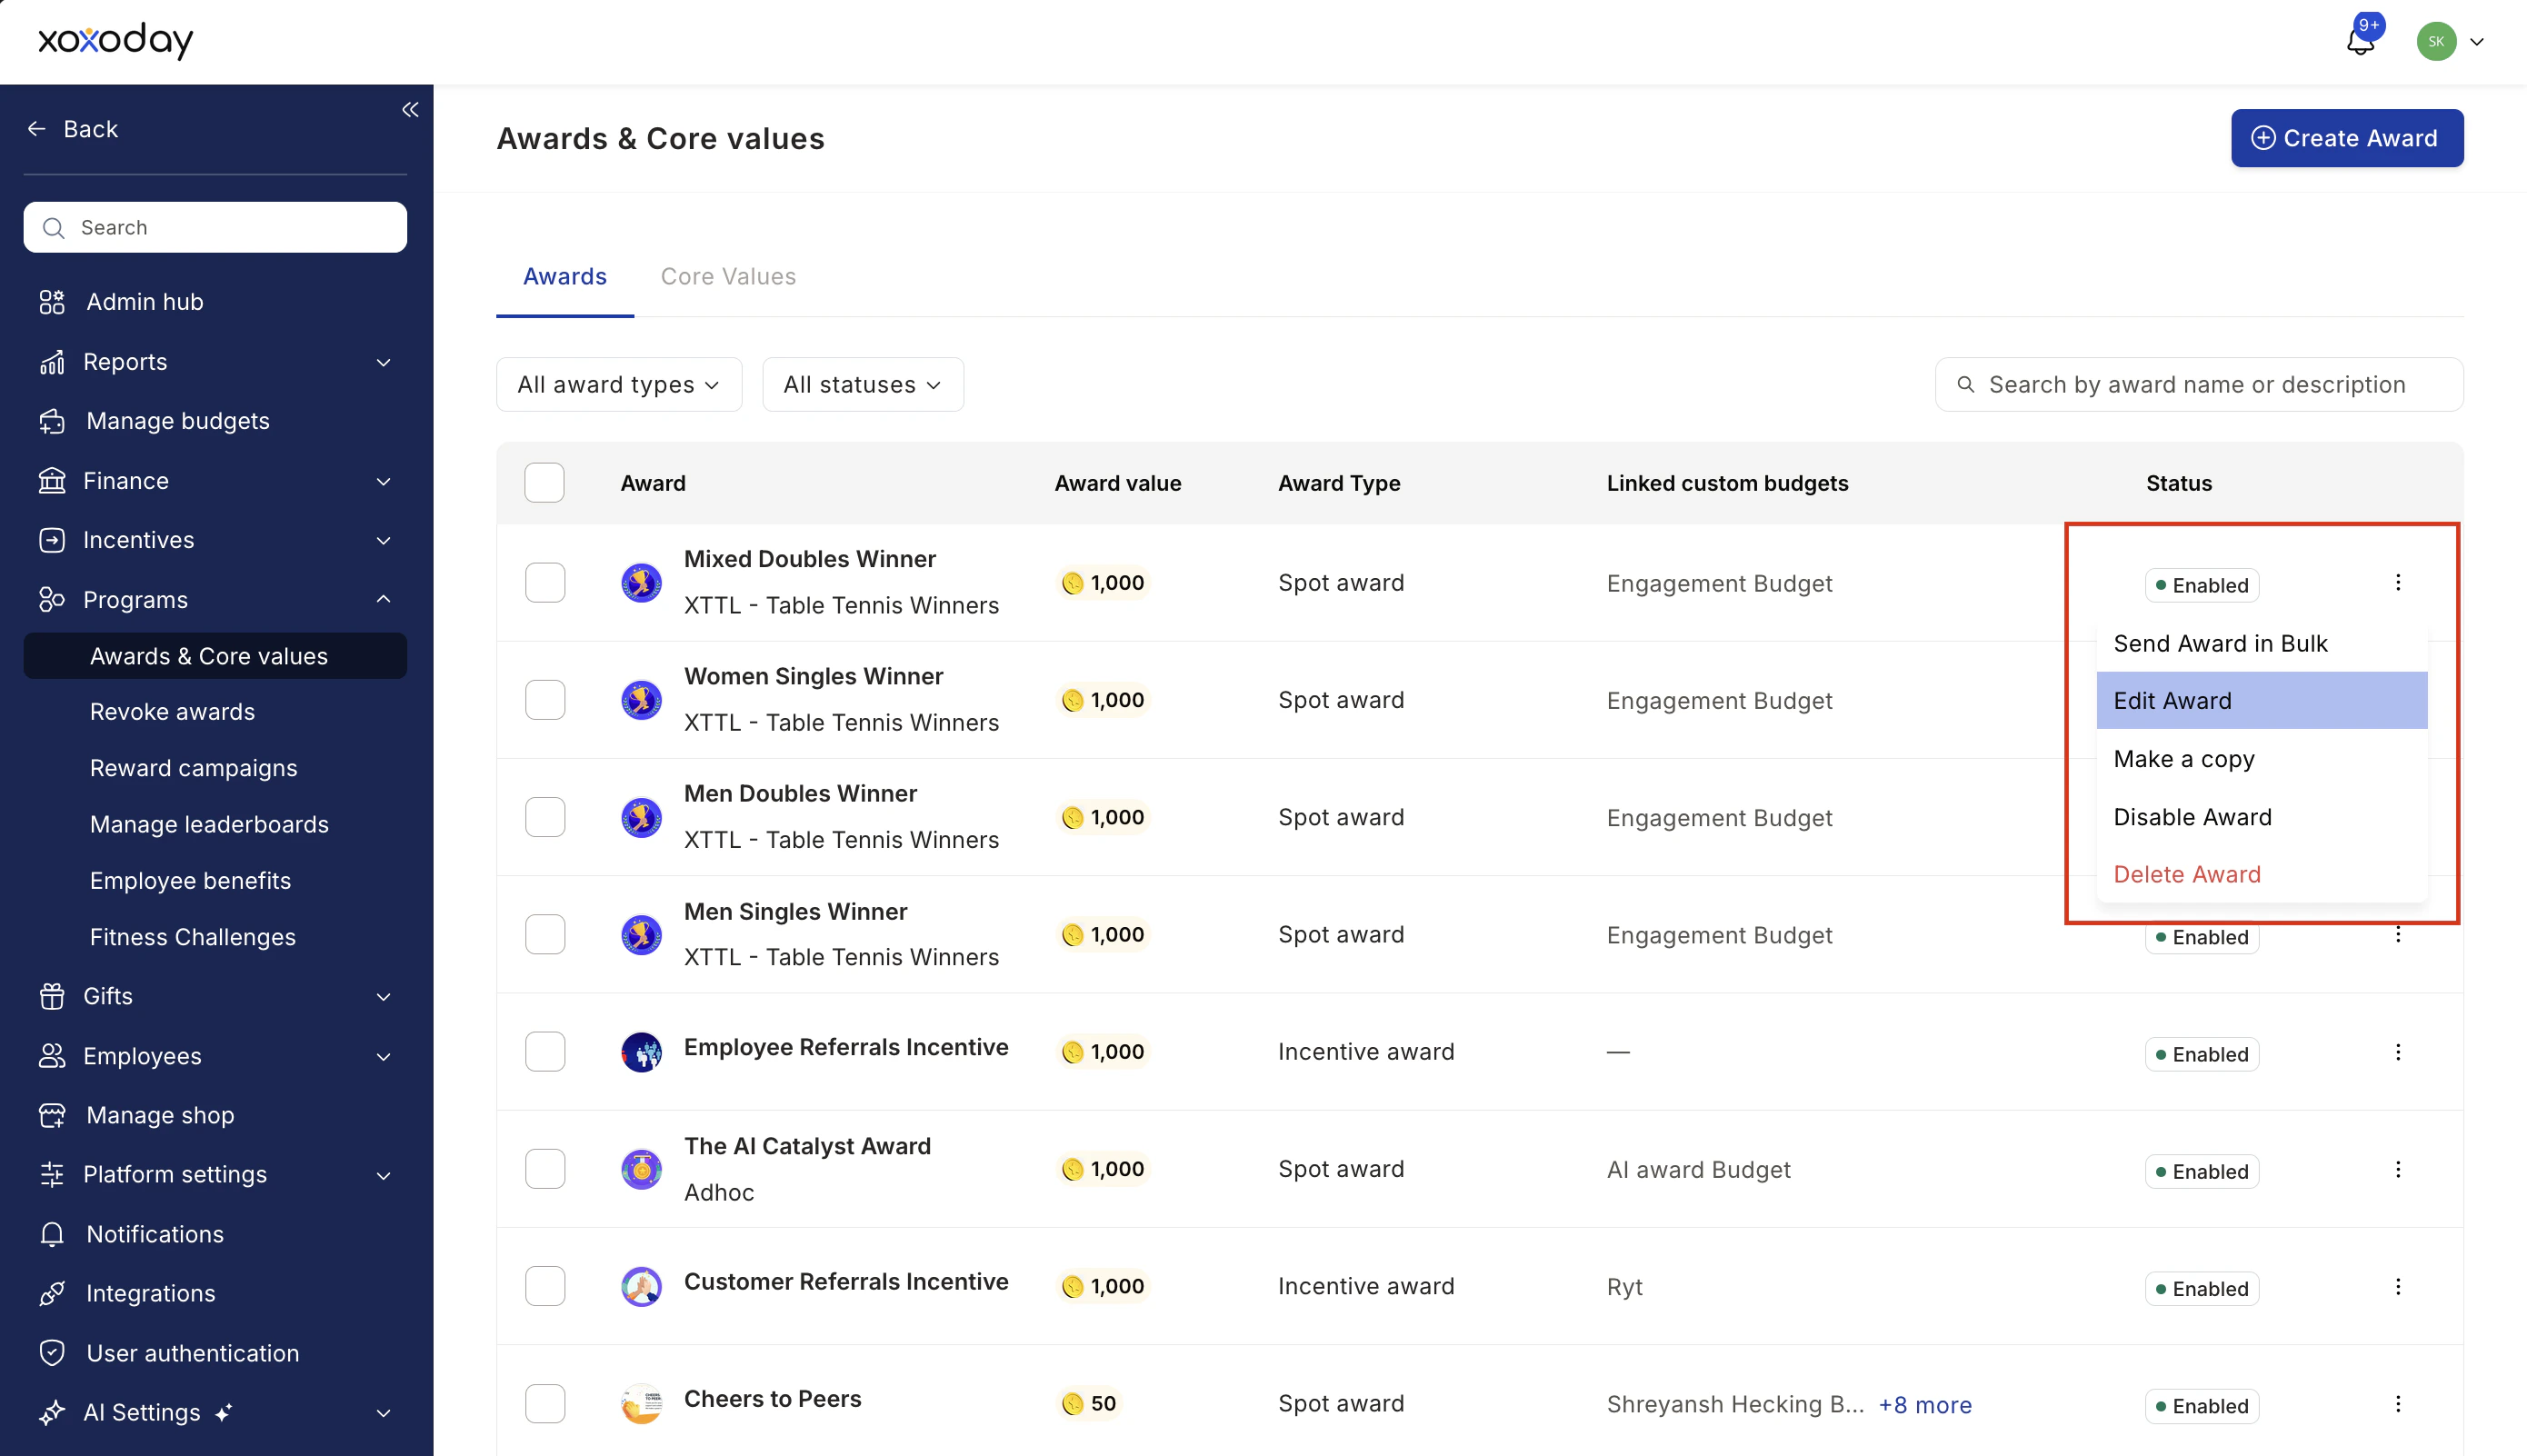
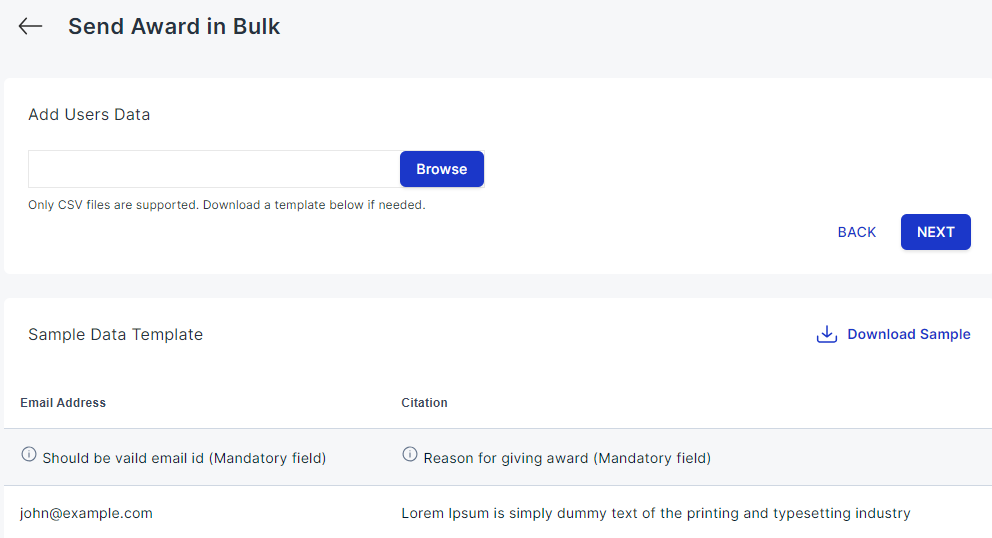
Bulk awards
Navigate to Programs > Awards & Core Values, hover over an award, click the three-dot icon, and select Send Award in Bulk.
Manage Core Values
Set up a core value card
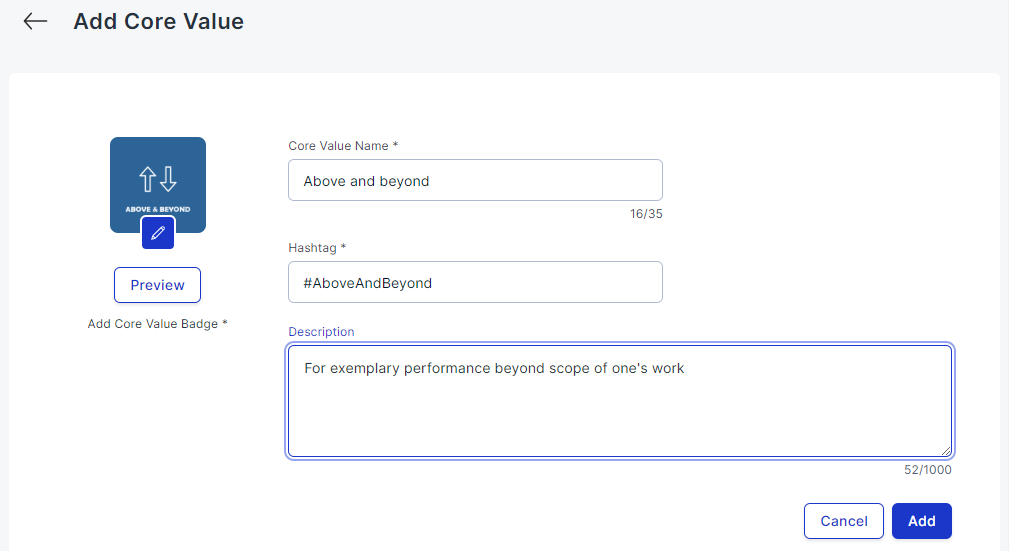
Value cards represent your company’s core values and the desired behaviours you want to recognise and reinforce at work.Choose or create a value card
Choose from existing value badges or click Add Core Value to create a custom card.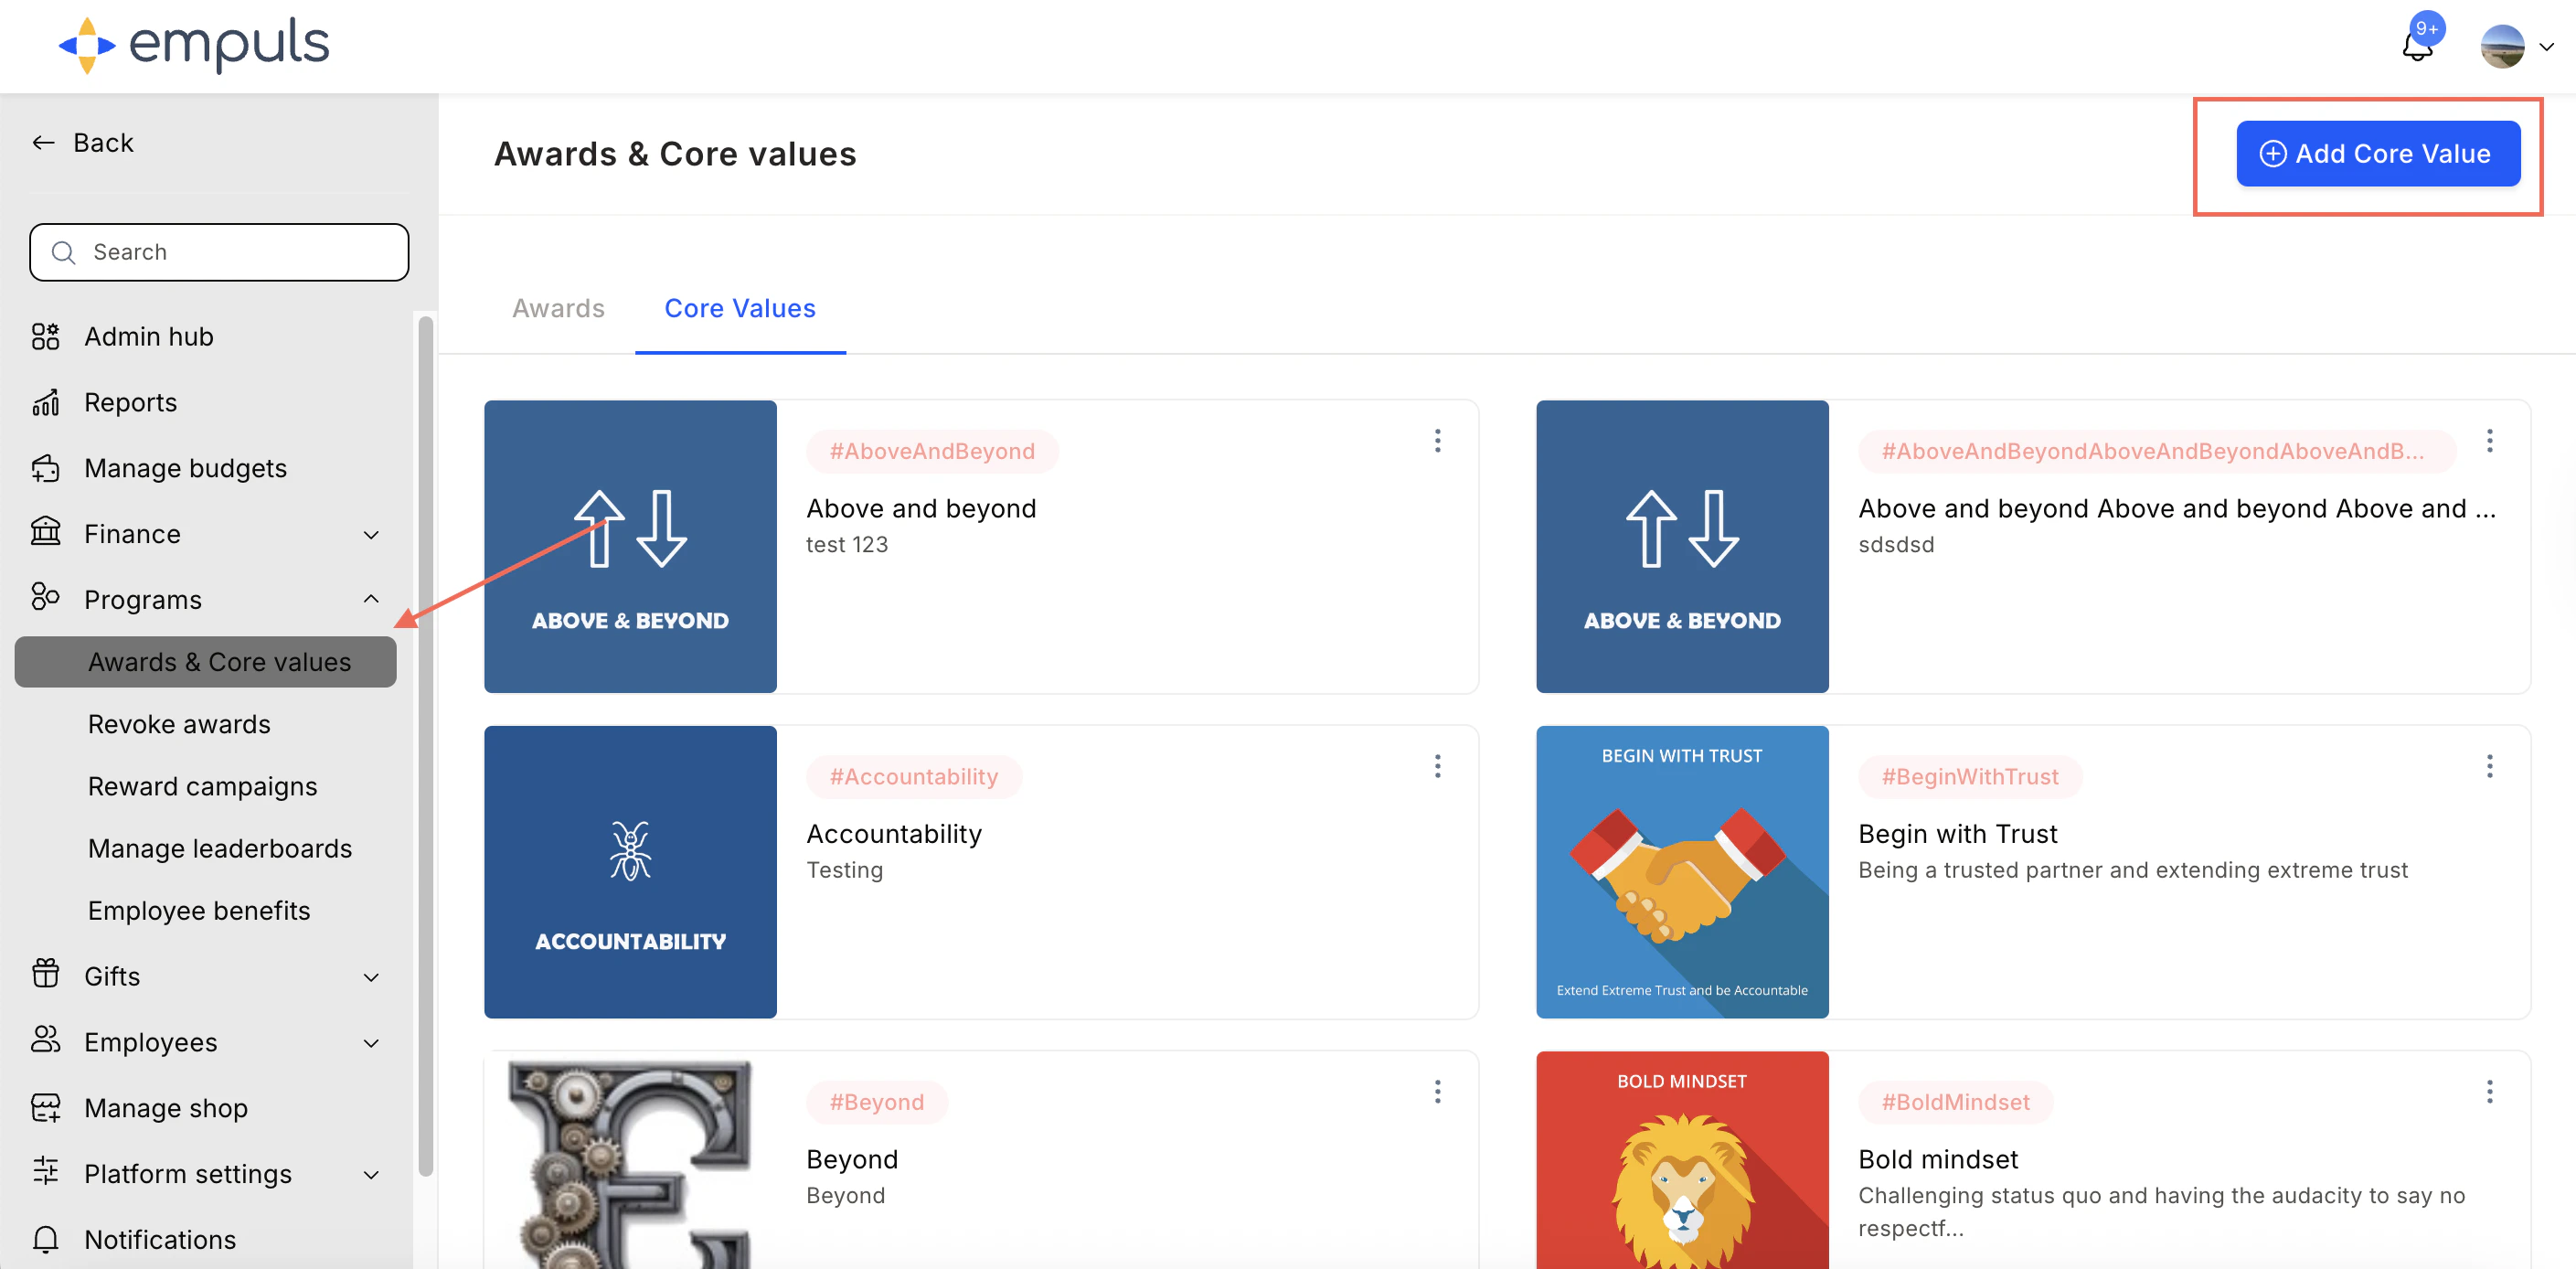

- Limit values to 5–8 for simplicity and adoption.
- Use distinctive icons, colours, and hashtags for each value.
- Link recognitions to company principles and behaviours.
- Review adoption trends quarterly.
- Recognise values publicly in feeds and leaderboards.
| Value | Hashtag | Description |
|---|---|---|
| Collaboration | #Collaboration | For individuals who promote teamwork and cross-functional success. |
| Innovation | #Innovation | For employees who propose or implement new ideas with impact. |
| Customer Centricity | #CustomerFirst | For employees who deliver exceptional customer experiences. |
| Integrity | #Integrity | For showing honesty and accountability in every decision. |
| Ownership | #Ownership | For employees who take initiative and deliver outcomes independently. |
| Motivation | #Motivation | For those who inspire and uplift their peers. |
| Inclusivity | #Inclusivity | For fostering a diverse and inclusive work environment. |
| Accountability | #Accountability | For maintaining reliability and commitment to results. |
Additional core value settings
Navigate to Programs > Awards & Core Values > Core Values tab. Click the three-dot icon on any core value card to edit, disable, or delete it.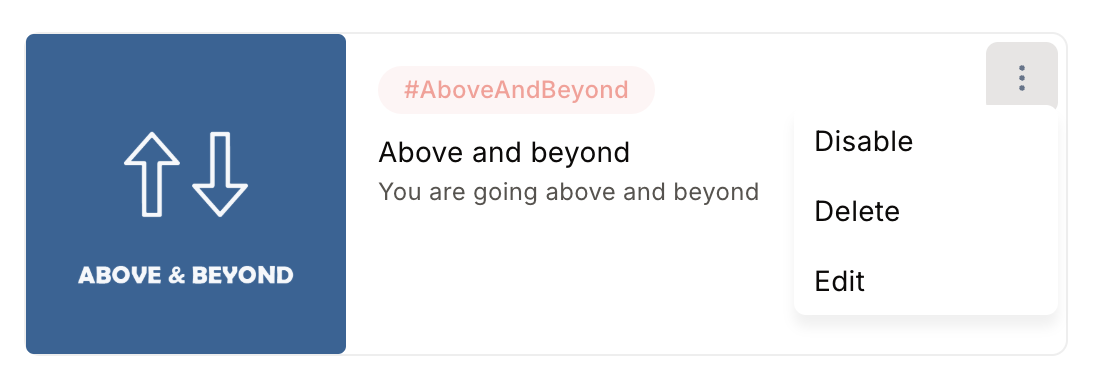
FAQs
What types of awards can I create?
What types of awards can I create?
Spot Award (instant, no approval), Approval Award (one or more approval levels), Jury Award (nominations reviewed by a jury panel), and Incentives (goal-based claims).
How do I create an award?
How do I create an award?
Go to Programs > Awards & Core Values > Create Award. Select the award type, enter a name, description, and image, set recipient and nominator rules, configure rewards (points, gift cards, certificates), assign a budget, and click Confirm and Create.
What reward types can I add?
What reward types can I add?
Fixed or range-based points, gift cards, physical products, or certificates. Team rewards can be split equally or given individually.
How do I edit or disable an award?
How do I edit or disable an award?
Go to Programs > Awards & Core Values, click the edit icon, make your changes, and save. Use the three-dot menu to disable an award.
What's the difference between disabling and deleting an award?
What's the difference between disabling and deleting an award?
Disable stops new nominations but retains all past data. Delete removes the award from the interface but past data and pending nominations stay intact.
How do I give awards in bulk?
How do I give awards in bulk?
Go to Programs > Awards & Core Values > [award] > three-dot icon > Send Award in Bulk. Download the sample CSV, fill in the details, upload it, select a budget, and confirm.
How do I create a core value?
How do I create a core value?
Go to Programs > Awards & Core Values > Core Values > Add Core Value. Enter the name, description, hashtag, and image. Save to activate.
B. Create an exclusive budget for this award
Use when you want to restrict budget usage exclusively to this award.- Create a new budget with a name and description. Set a validity period to retract unused points if needed. Click Next.
- Assign budget points to users individually or by filter. Preview the budget summary on the right and click Assign Reward Budget.
- Once points are distributed, you’ll receive a confirmation summary. Click Close to complete.
C. Assign points to the user’s personal budget
Best when you want budget owners to use points for any award.- Assign budget points to users individually or by filter. Preview the summary and click Assign Reward Budget.
- Once distributed, you’ll receive a confirmation summary. Click Close. You can also download the summary for your records.
Edit an award
Navigate to Programs > Awards & Core Values, hover over an award, and click the edit icon. Make your changes and click Confirm and Update to save.The award type cannot be changed after creation.
Additional award settings
Navigate to Programs > Awards & Core Values, hover over an award, and click the three-dot icon to:- Enable/disable — Disabled awards can no longer be nominated for, but existing nominations remain active.
- Make a copy — Duplicate an award’s configuration.
- Delete — Removes the award from the interface. Past data and pending nominations remain intact.
Bulk awards
Navigate to Programs > Awards & Core Values, hover over an award, click the three-dot icon, and select Send Award in Bulk.Manage Core Values
Set up a core value card
Value cards represent your company’s core values and the desired behaviours you want to recognise and reinforce at work.Choose or create a value card
Choose from existing value badges or click Add Core Value to create a custom card.
- Limit values to 5–8 for simplicity and adoption.
- Use distinctive icons, colours, and hashtags for each value.
- Link recognitions to company principles and behaviours.
- Review adoption trends quarterly.
- Recognise values publicly in feeds and leaderboards.
| Value | Hashtag | Description |
|---|---|---|
| Collaboration | #Collaboration | For individuals who promote teamwork and cross-functional success. |
| Innovation | #Innovation | For employees who propose or implement new ideas with impact. |
| Customer Centricity | #CustomerFirst | For employees who deliver exceptional customer experiences. |
| Integrity | #Integrity | For showing honesty and accountability in every decision. |
| Ownership | #Ownership | For employees who take initiative and deliver outcomes independently. |
| Motivation | #Motivation | For those who inspire and uplift their peers. |
| Inclusivity | #Inclusivity | For fostering a diverse and inclusive work environment. |
| Accountability | #Accountability | For maintaining reliability and commitment to results. |
Additional core value settings
Navigate to Programs > Awards & Core Values > Core Values tab. Click the three-dot icon on any core value card to edit, disable, or delete it.